How To Setup WooCommerce

Setting up your first ecommerce store on WooCommerce may be intimidating to first time users, but it doesn’t have to be. This guide will show you how to setup WooCommerce, step by step so you can get your shop up and running in no time!
WooCommerce Hosting
Before you can get your WooCommerce store set up, you will need to have a place to host it. The WooCommerce hosting provider you choose can depend on a wide range of factors including: cost, reliability, ability to scale (during peak seasons, or promotional periods), performance, and others.
Your hosting company should also be able to help you secure a domain name for your site if you don’t have one. You will want your domain name to be short, memorable, and descriptive of your website. It may include your company or brand name, or a description of the types of products you sell.
If you already have your WordPress website hosted somewhere, you can start with using that same website hosting account to setup WooCommerce. The nice thing about WooCommerce is that it is designed to run on your existing site, so you don’t need a separate website just for your ecommerce store. But if you don’t have a website setup already that’s OK too. Installing WordPress is usually a quick and easy process.
Install WordPress and WooCommerce
Most hosting companies these days have a one-click install for WordPress. After all, WordPress does power over 40% of the internet. So, it’s highly likely that your host’s customers will want to use WordPress. When you get into your hosting account, you will be able to click the link to “Install WordPress” and it will do all the hard work for you.
Not every hosting company can say the same for having a one-click WooCommerce install process. However, there are some that offer WooCommerce specific hosting that do have WordPress and WooCommerce pre-installed. With those you will be able to get started setting up WooCommerce right away.
If your hosting company doesn’t have an auto-installer for WooCommerce the process isn’t all that difficult either.
How To Manually Install WooCommerce
First, you will want to login to your WordPress site as an administrator. The first account that gets created with your WordPress site is an administrator account. However, you can add other administrator accounts after the site has been set up too.
Next, navigate to the Plugins > Add New menu.
In the search box, type in “WooCommerce”. In a few seconds the page will show WooCommerce and a number of other WooCommerce-related plugins that are available to install.
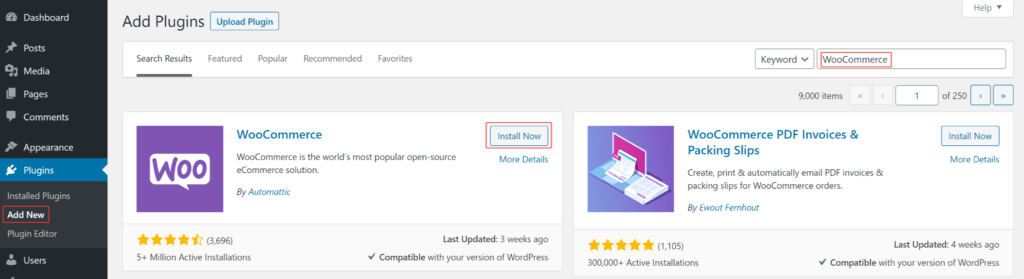
Locate WooCommerce in the list of plugins and click the Install Now button.
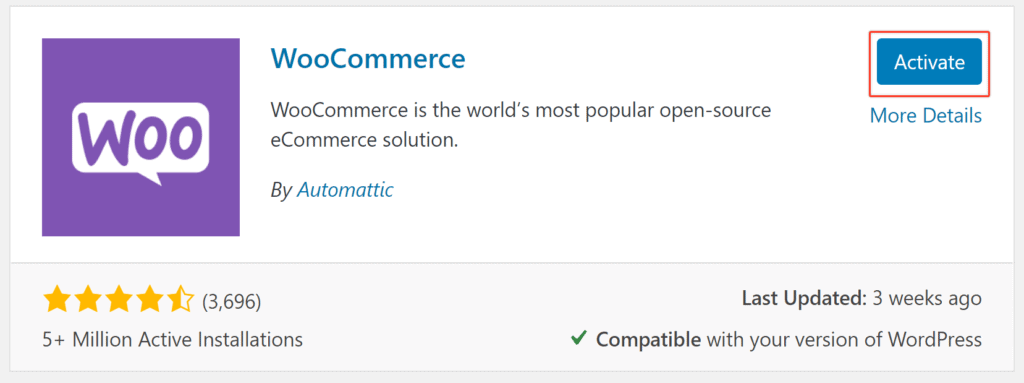
That button will turn to an Activate button after it finishes installing WooCommerce. Click on the Activate button to begin setting up WooCommerce.
How To Run WooCommerce Setup Wizard
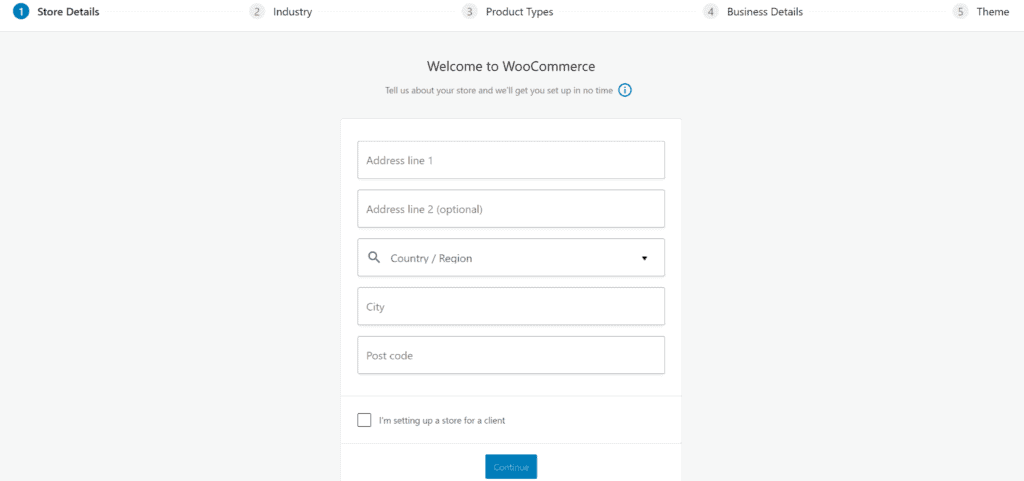
After it activates, the WooCommerce setup wizard should load on your screen automatically. Here, you will enter general details about your store, which will help WooCommerce tailor the software to your store’s needs.
Enter your store’s postal address. If you have more than one physical location, pick the one where you prefer to receive packages and other mail (including returns). This address may show up to your customers later on in their order invoices and other correspondence so be sure to fill this in. If you enter the wrong address or change your mind, don’t worry! You can always change it later.
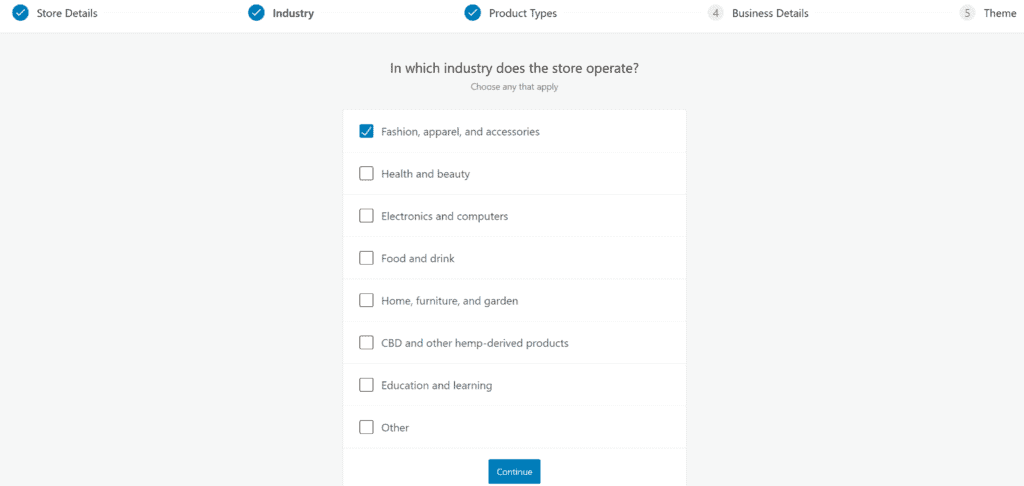
WooCommerce asks you for the industry that your store operates in. This appears to be so that the WooCommerce setup wizard can suggest more relevant settings for you later on.
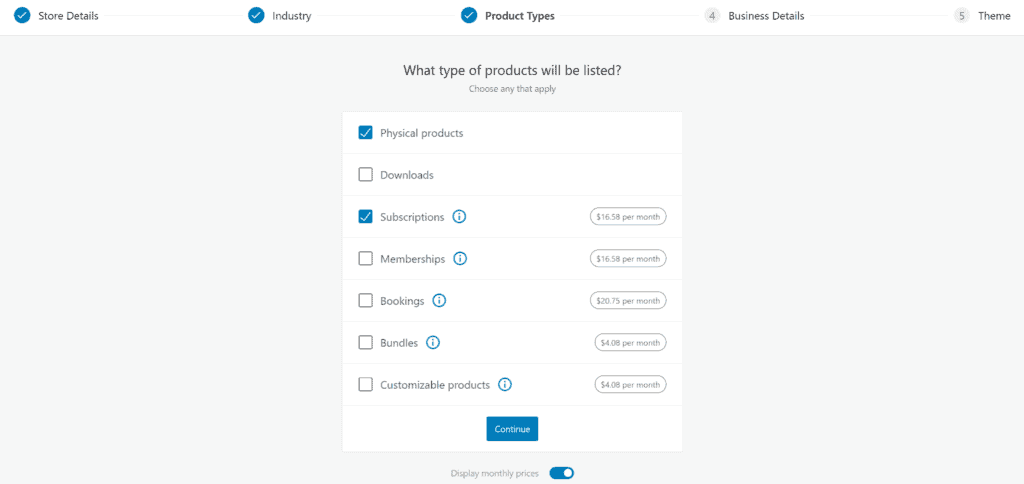
WooCommerce also has several types of products that you can sell. Physical products and virtual (downloadable) products come standard with WooCommerce. These cover some of the most common products sold through e-commerce. However, you may need a more specific option, such as subscriptions, memberships, bookings, and others. WooCommerce offers these as paid upgrades. Checking the box next to any of the paid options doesn’t install them automatically. It will, however remind you to purchase these add-ons later on in the WooCommerce setup process.
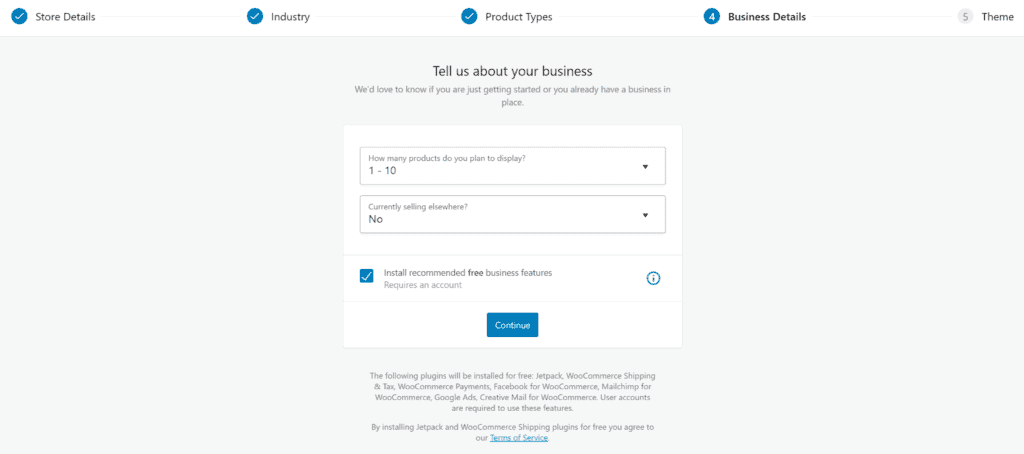
The next step asks you about your business. These questions include how many products you are selling and if you are selling them on another platform. Your responses to these questions may help WooCommerce prompt you with further questions to help setup your store. Some of the additional questions that come up are less clear to me why they are relevant other than for internal statistics that WooCommerce may collect. Additionally, there is an option to install “free business features”. This will automatically install and activate several plugins, which can help you administer your store. However, none of these additional plugins are required so you don’t have to check the box. Plus if you don’t check the box and want to install these plugins later on you can do that rather easily.
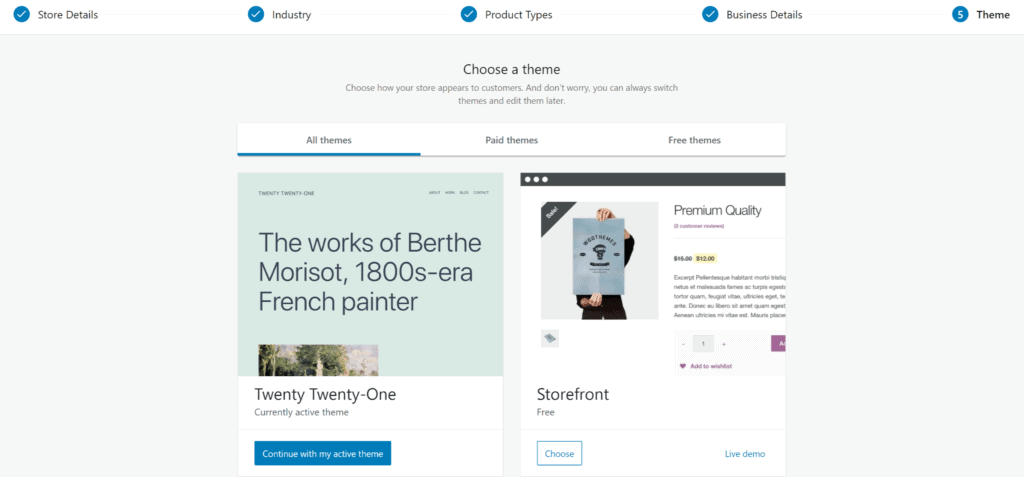
Finally, the WooCommerce setup wizard will ask you to choose a theme. Your choice here will change the layout of your entire website, not just the shop portion. So, if you already have a website and you’re happy with how it looks, choose the option to continue with your active theme. If you’re setting up your site for the first time and haven’t had a chance to customize how it looks, look around and select a theme. There are a mix of free and paid themes offered to you, so be sure to pay attention to the prices listed. Regardless of what you pick, you can always choose another theme later by going to Appearance > Themes, or searching online for paid themes that may not show up here.
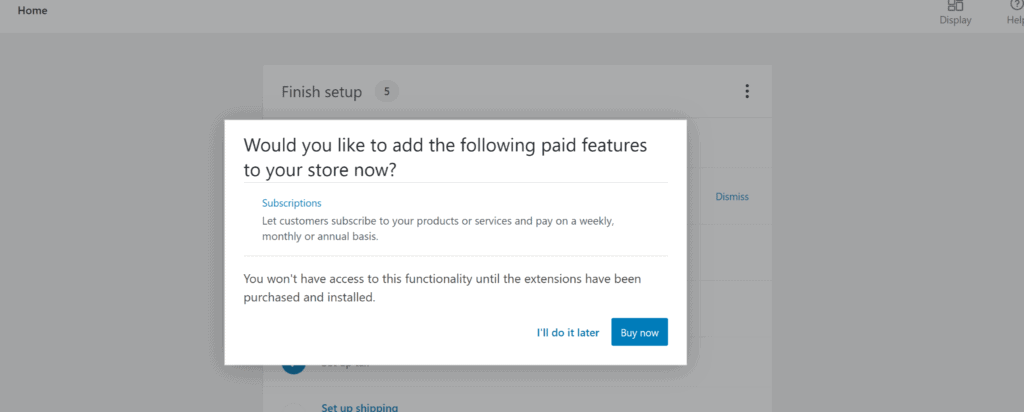
After you finish the setup wizard, there may be a few additional upsells that WooCommerce offers you. That’s how they make their money, so you can’t really blame them for it! All of them are optional, and you can easily decline the upsell offers if they don’t interest you.
WooCommerce setup will then present you with a checklist of any last to-do items for you. Listed next to each is an estimate of how long each step will take. If you selected any options that require paid upgrades (i.e. subscriptions, memberships, a paid theme, etc.) the WooCommerce setup checklist will add those items as an option. When you click them they’ll prompt you to purchase the required plugin(s) before you can continue. Clicking the “Buy Now” button will take you directly to the WooCommerce checkout page with the required product(s) in your cart. You can then download and install each plugin individually. Each of those plugins will have their own setup steps, which we won’t cover here.
How To Add Shipping Costs to WooCommerce
Shipping is one of the areas in the WooCommerce setup that you will want to take a few extra minutes to make sure you have working correctly. If you don’t, you could end up preventing customers from buying from your store since shipping is very much location dependent. If there are no shipping options available for a customer’s location, they may not be able to checkout. With a little attention to how to add shipping costs to WooCommerce you won’t have a problem though.
In the WooCommerce > Settings > Shipping tab, you will find several options, including shipping zones, shipping options, and shipping classes.
Setup WooCommerce Shipping Zones
Shipping zones are geographic regions where certain shipping methods are offered. WooCommerce will use the customer’s shipping address to determine which shipping zone they are in.
Depending on your store, you may want to offer local pickup or delivery options for customers in your town or the next town over. While customers in other areas could have traditional postal shipping methods available to them. You can even set up shipping zones based on the countries you want to ship to.
Keep in mind that if you are shipping internationally, your customers may get upset with the high cost of shipping. In some cases it may make sense to not offer shipping to all locations.
Setup WooCommerce Shipping Options
The shipping options give you some flexibility over the way shipping costs are displayed and calculated. Each of these options will enable your customer to view the shipping costs differently based on your choices.
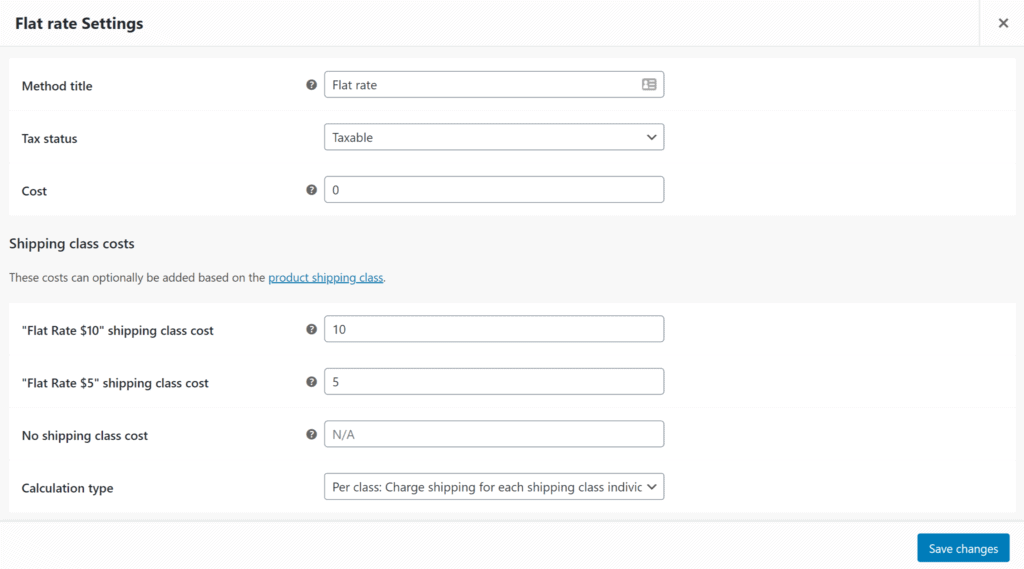
Setup Shipping Classes in WooCommerce
Shipping classes provides you with a way to group similar products as a way to provide different shipping rates to different classes of product. Within each shipping zone, certain shipping methods (such as flat rate shipping) will enable you to enter a cost for each shipping class.
This allows you to set different shipping rates based on the type of product you sell. Larger products could all belong to a more expensive shipping class. Similarly, smaller products could belong to a less expensive shipping class.
How to Add Products to WooCommerce
WooCommerce setup has a few options for adding products to your store. You can:
- Manually add products one-by-one
- Import products by a CSV file
- Migrate products from an existing store
Manually adding products in WooCommerce is a good option for new stores with few products to add. Assuming you have all of the information to add to the product, it should only take you a minute or two to add each product to the store.
Importing products by a CSV file in WooCommerce is a better option if your store has many products. Those one or two minutes can really add up if you have hundreds or thousands of products to add to your store. WooCommerce comes with a CSV template file in the wp-content/plugins/woocommerce/sample-data directory. You can use it to add products quickly and accurately.
Migrating products from an existing store into WooCommerce may be the best option if you are moving your e-commerce store to WooCommerce from another platform. With the available migration tools, you can let WooCommerce import each of your products from your old platform. This will save you quite a bit of tedious work.
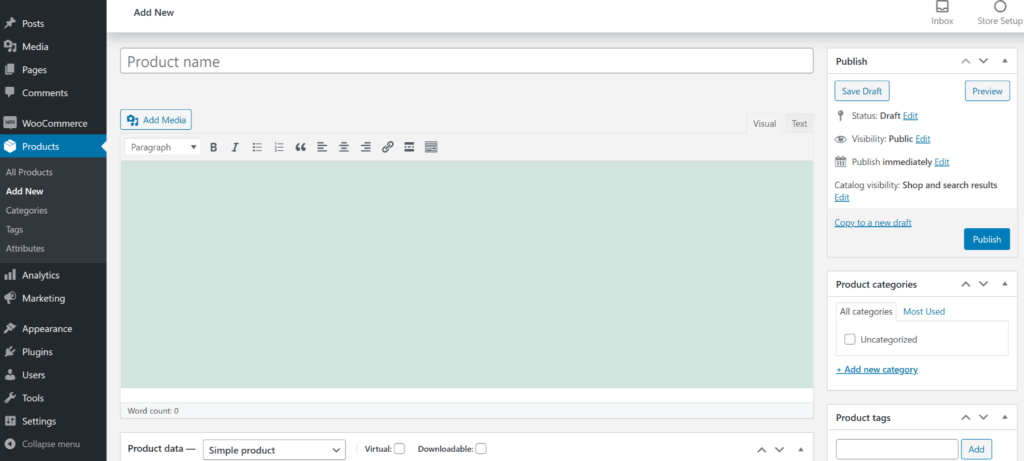
Adding Products to WooCommerce
Regardless of which method you choose to add products to WooCommerce, you will need a few pieces of information for each product. These are:
- Product name
- Product description
- Price
- Product image(s)
- Inventory
- SKU, or “Stock Keeping Unit”, which refers to a unique identifier for each product and service that can be purchased
- Product category/tag to help group similar products together (i.e. hats, t-shirts, sweaters, etc.)
- Shipping information such as weight and dimensions if you are shipping products
Some products will require a little more information, but this is the basic information that you will want to have for each product.
How to Setup Taxes in WooCommerce
No matter where you’re selling, taxes can tricky to get setup properly. Each city, state, province, and country could potentially add new taxes that you’re responsible for. Certain types of products are taxable while others may not be. Sometimes shipping is taxed, and other times it isn’t. Taxes can be really hard to wrap your head around. Depending on the complexity of taxes in the area(s) you do business in, it may make sense to get a knowledgeable accountant to help make sure taxes are setup correctly.
Just like when you added products to your WooCommerce store, there are several options for setting up taxes. These options include:
- Manually adding tax rates
- Importing tax rates from a CSV file
- Using a third party service to calculate taxes for you
Manually adding tax rates is best if you only have a few locations that you are selling your products to. Businesses that offer local pickup and delivery options can easily enter the taxes for the areas they already service. Likely, you are already familiar with the tax rates for these areas since you already service them.
Businesses that ship to many different regions may need to import tax rates with a CSV file. Similar to the product import template file, WooCommerce comes with a tax rate template file. This file can be found in the wp-content/plugins/woocommerce/sample-data directory.
Finally, there are a number of third party services that can help with more complex tax situations. Most of these services keep tax rates updated with any changes to tax rates in the areas you sell to. This can be really beneficial if you are selling in many locations so that you don’t have to keep up with every change local governments make in those areas. The downside to using these services is that they typically charge a fee for you to use them. These fees vary based on the provider you go with, so do your research on them before you sign up.
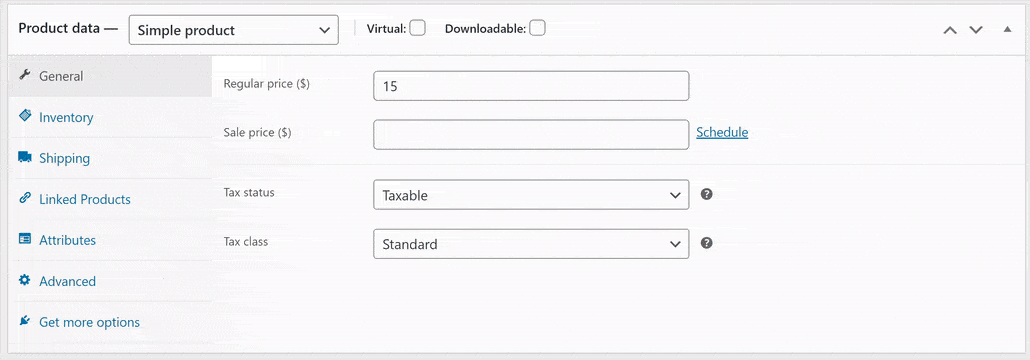
Even with an automated third party tax provider, you will still need to assign a tax status to individual products. Certain products will be taxable in your area, while others will not be. These third party tax providers don’t know the nature of your products, so you’ll still need to identify products that are and are not taxable. This can be done in the individual product settings. As you can see, taxes can be pretty tricky to setup accurately.
How to Setup Payment Gateways in WooCommerce
Anyone who is selling their products online will want to get paid eventually. In most cases this will require a payment processing company to process your customer’s credit or debit cards. However, there are options to allow your customer to pay via check or cash on delivery. These can be great options for food delivery businesses because it makes the checkout process quick and easy. It also is less expensive since there are no payment processing fees.
On the other hand, your customers may expect the ability to pay with their credit card. There are many different options for you to consider when deciding on which payment processor to use. You will have to keep in mind considerations such as:
- The availability of the provider in your country and the countries that you are selling to. Many providers do not operate in every country.
- Any restricted products that you might sell, which goes against the terms of service for the provider. Items such as weapons, drugs, gambling, adult content, or high risk businesses may be prohibited even if they are legal to sell in your area.
- Ease of use for both your customer, and you for setting up and using it day-to-day.
- Ability to process (and refund) the charges through WooCommerce. Keep in mind special circumstances like subscriptions, which not all payment processors handle automatically.
- Fees that the processor charges.
Some of the more popular WooCommerce payment processors are WooCommerce Payments, Stripe, and PayPal. All have roughly the same fees and they have about the same policies with restricted products, so they’re pretty much even there. The difference between the them comes in where the customer enters their payment information.
With Stripe and WooCommerce Payments, customers never have to leave your website. Customers will enter their credit or debit card information right on your shop’s checkout page. The benefit of this is that it offers a seamless experience for your customers.
PayPal on the other hand may require customers to temporarily leave your site in order to enter their payment information. With PayPal, customers can choose to pay with their credit or debit card, or through their PayPal account. The difference is that PayPal will redirect your customers from your shop in order for them to enter their preferred payment method. This could be confusing to customers who aren’t familiar with PayPal and may cause some of them to abandon their purchase.
Regardless of what WooCommerce payment method you choose, you will want to make sure it fits all of the needs of your store and your customers.
How to Test Your WooCommerce Store
Once when everything is set up on your store, you will want to test it out to make sure that your customers don’t run into any issues.
There are a few things you will want to be sure to test on any new WooCommerce store, including:
- Add to cart functionality
- Shipping rates calculate correctly
- Taxes calculate correctly
- Payments process successfully
Testing the add to cart functionality is important because if customers can’t add a product to their cart they can’t purchase it. Fortunately, this test is rather easy. Navigate to your store and click the add to cart button on a product. I would suggest testing this on both the shop page and on an individual product page. The reason why is because there could be plugins that have a conflict on one of those pages but not the other. Plus this is a rather quick test to perform, so it’s worth the extra step to make sure it’s working. Really, all you are trying to test here is to see if the add to cart function works as expected. The last thing you want is to have a rogue plugin preventing your customers from buying your products.
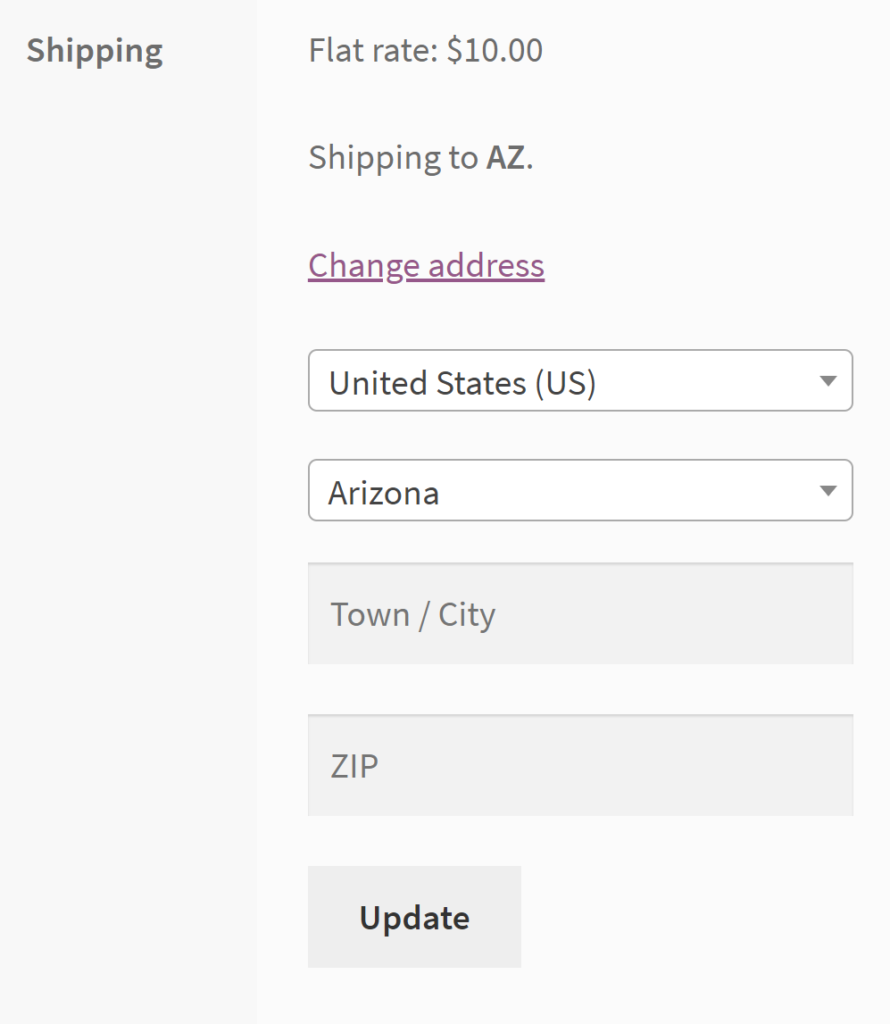
After you tested the add to cart functionality, visit your shopping cart to test the shipping rate calculation. Come up with a list of shipping locations you will be shipping to. Next to each location add what you expect the shipping rate to be based on the product(s) you are testing. Then enter each shipping location in the field on the cart page. Check to see if each change you make produces the expected shipping result.
Similarly, you will want to test your taxes the way you tested the shipping rates. By entering various locations, you should be able to see the tax rates update on the checkout page. Then, check to see if these rates match what you expect them to be for the location you are testing.
Assuming that everything appears to be in order so far, you will want to test one last thing. The payment processing functionality.
How to Test WooCommerce Payments
If you are using a payment method like cash on delivery, or checks you can test the order with everything as-is. It will be the same way that your customer would experience it. These don’t require any special setup to test them. With this method of testing, you can place an order and then cancel it afterwards. This will “restock” the product(s) that the test order subtracted from your inventory.
However, if you are using a third-party payment gateway, you will need to use their “test” or “sandbox” mode. Testing in these modes will enable payments to process without any actual funds being transferred. Both the test mode and live mode will require different sets of API keys (one for live and another for testing). These are provided by the payment gateways. Enter both into the WooCommerce settings so you’ll have them for the future if you ever need to test again.
With Stripe, they give a variety of “test” credit card numbers you can use to produce various results. Most importantly, you want to make sure that the purchase can process successfully with a valid credit card number. You also want to make sure that purchases do not process if an invalid credit card number is entered. All of this is possible with the test credit card numbers Stripe provides.
For PayPal, you will need to log into a Sandbox test account using your existing account credentials. In that account, they will give you a test account email address. When testing PayPal with WooCommerce on your store, you will want to use this test email address. This way your payment won’t use real payment details and charge your credit card or PayPal account.
After you complete testing of your payment gateways, you should go back into the WooCommerce Payments settings and switch them back to “live” mode. Otherwise your customers won’t be able to checkout with real credit cards on your site.
WooCommerce Setup Final Thoughts
Once when you are confident that your WooCommerce store is working as expected, it is time to open up your store to the public. Marketing your WooCommerce store is a whole separate topic, with it’s own complexities worth exploring. After all of your hard work to setup up your WooCommerce store, you should aim to get as many customers as you can handle!