How To Add WooCommerce Shipping Costs

If you sell physical products in your WooCommerce store, shipping costs are going to be a really important aspect of setting up your WooCommerce store. If you are wondering how to add WooCommerce shipping costs to your store, this post will help guide you through the process.
Determine When To Charge Shipping Costs
Customers have become conditioned to expect little to no shipping costs when buying online thanks to larger retailers like Amazon. If you charge too much for shipping, you could lose the sale to another retailer. If you charge too little, you could end up losing money on the sale.
One tactic that many retailers use is to increase the cost of their products slightly so that they can offer free shipping. The increase in the price that their customers pay for the product covers the cost of shipping, and makes the customer still feel like they’re getting free shipping. Some store owners may not like this practice because it is hard to determine exactly what your shipping costs will be for each sale.
Regardless of what you choose you will still need to set up some sort of shipping options on your WooCommerce store.
WooCommerce Shipping Zones
The first step in setting up WooCommerce shipping costs is to add shipping zones. Shipping zones are considered the geographical areas that you will ship items to. These areas can be specific – down to the zip code, or more general like a state or even an entire country or continent. Ultimately the regions included in each zone will be up to you to decide.
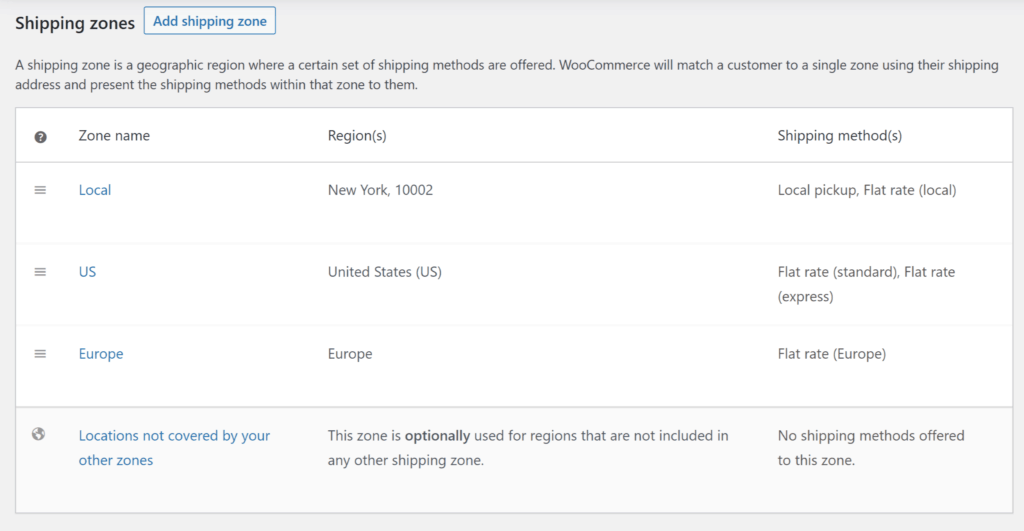
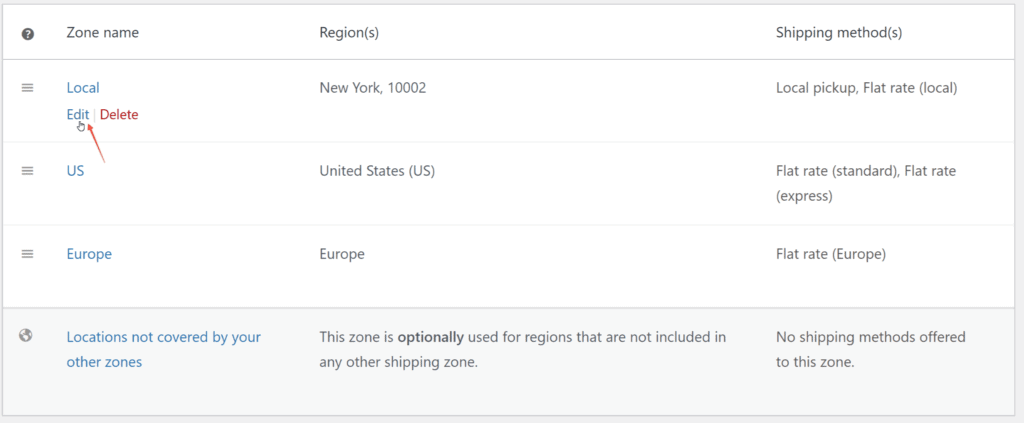
When a customer enters their shipping address, WooCommerce will only display the shipping methods available to their shipping zone. This means that each customer will match exactly one zone. Your shipping zones may look something like the table below.
| Zone | Region | Shipping Methods |
|---|---|---|
| Local | New York 10002 | Local pickup, Flat rate (local) |
| US | All of US | Flat rate (standard and express) |
| Europe | All of Europe | Flat rate (Europe) |
| All other | Locations not covered by other zones | No shipping methods |
You can add as many zones as your store needs. Each zone can have multiple shipping methods, or none at all. However, if there are no shipping methods available for the customer’s shipping address they will be informed that no shipping is available to their area.
Adding Shipping Zones
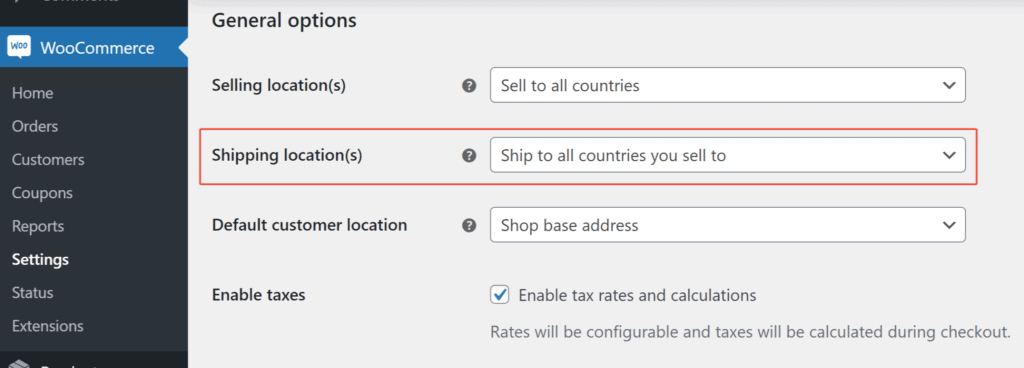
To add shipping zones in WooCommerce, navigate to WooCommerce > Settings > Shipping tab. Note that this setting may not be available to you if you did not enable shipping for your shop. To fix that, navigate to WooCommerce > General. Under the General Options section select the option appropriate for your store.
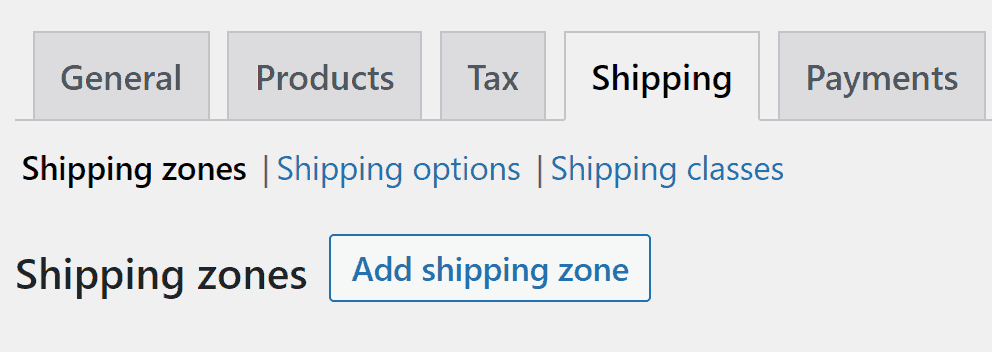
To begin adding shipping zones, navigate to WooCommerce > Settings > Shipping > Shipping Zones.
By default there is already a shipping zone set up for you, called “Locations not covered by your other zones.” This is a fallback to accommodate any customers who want to ship to a location that doesn’t match any of the other zones you add. Adding shipping methods to this zone is optional. If you do add shipping methods, it could mean that you will end up shipping to the other side of the world, so use it cautiously.
To add a new zone, click the Add Shipping Zone button.
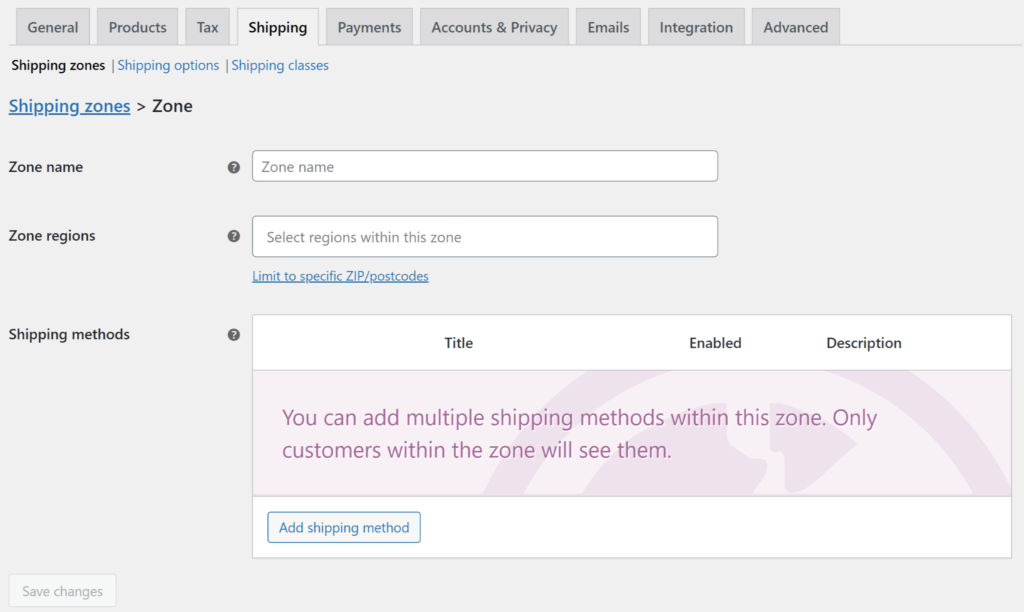
Enter a descriptive Zone Name, and select all of the regions that apply to this zone. Regions consist of continents, countries, and states (provinces). If you want to limit your zone to specific zip/postcodes click the link below the regions box. The postcodes can then be set with a list of specific postcodes (one per line), a range of postcodes (10001…10286), or can use an asterisk wildcard (9021* would cover 90210 through 90219).
After setting your shipping zones you will want to make sure they are ordered correctly. In the shipping zone list, the first zone that a customer matches will be the zone that they will see. In the example below, someone living in New York 10002 also lives in the US, but they will see the shipping methods in the first “Local” zone. They won’t see the shipping methods available to the rest of the US.
WooCommerce Shipping Methods
The next step in setting up WooCommerce shipping costs is to add shipping methods to your shipping zones. If you plan on offering free shipping, local pickup options, or even flat rate shipping (i.e. a fixed amount for each order), WooCommerce has everything you need. For those three shipping options, you won’t need to install any other plugins. If you want to include calculated shipping rates from specific carriers (i.e. UPS, FedEx, USPS, etc.) you will need an additional plugin to handle those rates. However, in this post we are only exploring the default shipping methods.
Setup WooCommerce Free Shipping
Offering free shipping is a great way to keep customers from turning to larger retailers who offer it on most purchases. Since many retailers offer free shipping, you could lose out on sales if you don’t offer it too. It is also a great way to encourage your customers to spend more. By offering free shipping on orders over a certain amount, your customers may be more likely to spend a little more in order to qualify for free shipping.
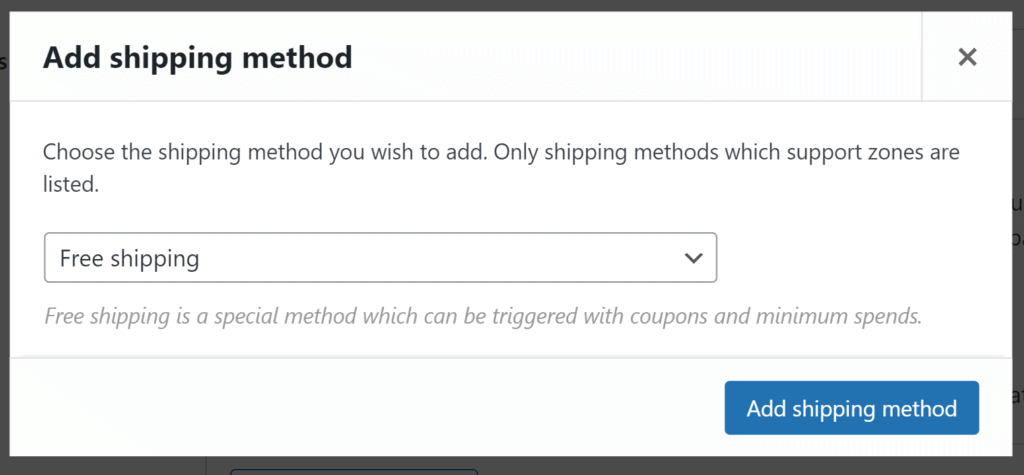
Navigate to the WooCommerce > Settings > Shipping tab, and then click Edit under the shipping zone you wish to add Free Shipping to.
Click the Add Shipping Method button and a modal window will then pop up. Then, select Free Shipping in the dropdown menu and click the Add Shipping Method button.
Configuring Free Shipping Settings
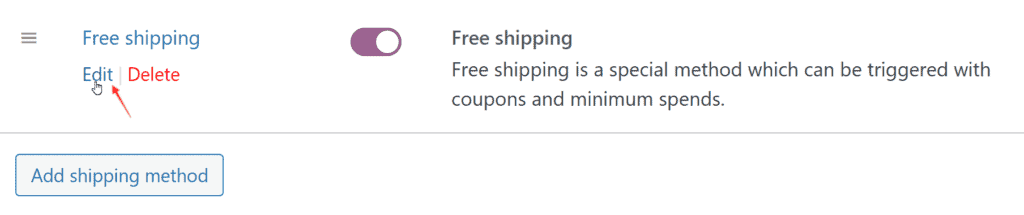
After that, click the Edit link under the Free Shipping method.
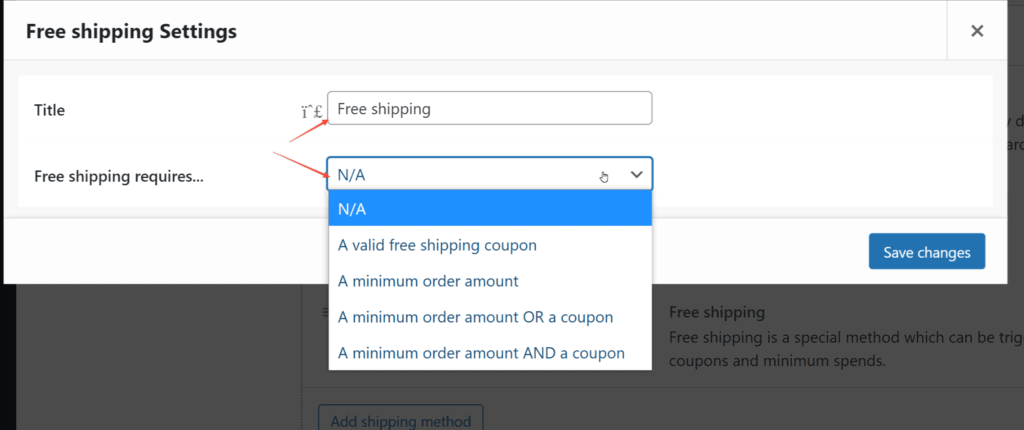
The next modal window will let you apply settings specific to this shipping method for this shipping zone. You can customize the title that customers see on the checkout page, and select any requirements for this shipping method to be displayed. The special requirements include:
- N/A (not available). Free shipping will be available to all customers in this zone.
- A valid free shipping coupon. Customers must enter a valid coupon that enables free shipping.
- A minimum order amount. Free shipping will be available if a minimum order total is reached.
- A minimum order amount amount OR a coupon. Free shipping will be available if the customer’s order reaches a certain minimum amount or they enter a valid free shipping coupon.
- A minimum order amount AND a coupon. Free shipping will only be available if the customer’s order reaches a certain minimum amount and they enter a valid free shipping coupon.
The Minimum Order Amount field is displayed if a minimum order total is required for free shipping to be enabled. In this box, enter the amount you want customers to spend before offering them free shipping.
When selecting one of the coupon options, a Coupon Discounts option will be displayed. If you check this box, free shipping will be available based on the order amount before applying the coupon’s discount. For example, if you have a 10% coupon that enables free shipping on orders over $50 and an order comes to $50 before the discount. By checking the Coupon Discounts box, the customer will receive free shipping. By leaving it unchecked, the customer will not receive free shipping since the coupon will be applied first and their new order total will be $45.
Setup WooCommerce Flat Rate Shipping
Flat rate shipping is a great option if you need to charge for shipping. This keeps things relatively simple for customers so they know exactly how much they will be charged on top of their order total for shipping.
Like in the Free Shipping setup, you will go to WooCommerce > Settings > Shipping tab. Then click Edit under the shipping zone you want to add Flat Rate shipping.
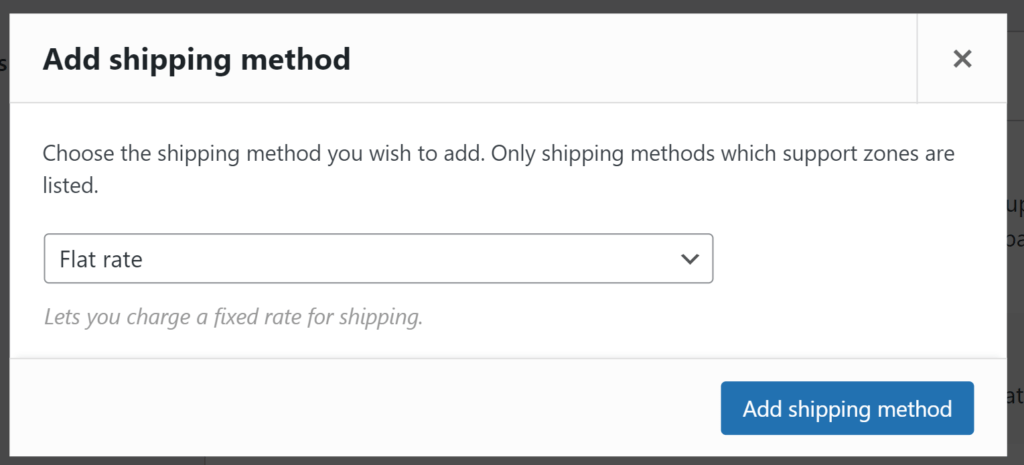
Click the Add Shipping Method button and a modal window will then pop up. Then, select Flat Rate in the dropdown menu and click the Add Shipping Method button.
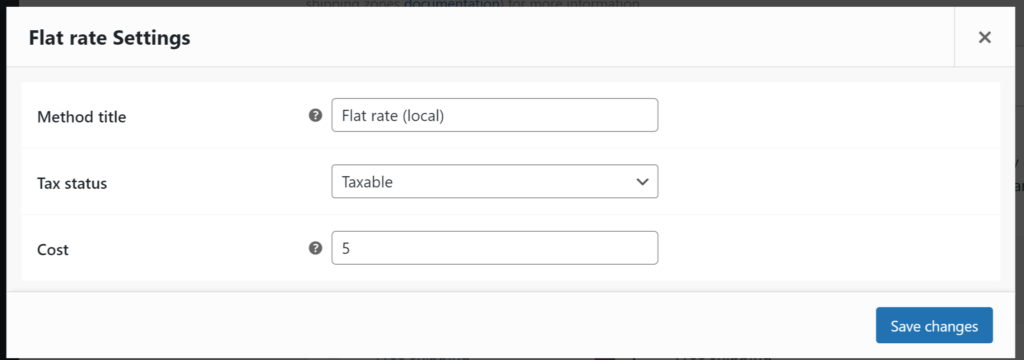
After that, click Edit under the Flat Rate shipping method you wish to configure. Note that each shipping zone can have more than one Flat Rate shipping option. For example, you can set a more expensive flat rate option for heavier items, and a less expensive option for lighter items.
Enter a title that customers will see at checkout, determine whether or not the shipping cost is taxable, and enter the cost of shipping.
Cost Field Calculations
The cost field isn’t limited to a fixed flat fee. WooCommerce gives us several placeholders to calculate a fee here. For instance, the fee can be calculated based on the quantity of items the customer is purchasing, or as a percentage based to charge a certain percent of the order total as a shipping fee. To do this, you will enter placeholders into the cost field. Available placeholders include:
- [qty] for the number of items in the cart.
- [cost] to charge a fee based on the cost of items in the cart.
- [fee] to charge an additional fee based on the total order cost. This placeholder has three additional arguments you can add.
- percent: the percentage of the total order cost to charge.
- min_fee: the minimum amount to charge.
- max_fee: the maximum amount to charge.
Cost Field Calculation Examples:
A base shipping cost of $5 plus $2 for each item in the cart ($7 for 1 item, $9 for 2 items, etc.)
5 + ( 2 * [qty] )

The shipping cost will be 25% of the total order cost ($2.50 for a $10 order, $5 for a $20 order, etc.)
0.25 * [cost]

A base shipping cost of $10 plus 25% of the total order cost ($85 for a $300 order, $122.50 for a $450 order, etc.)
10 + ( 0.25 * [cost] )

The shipping cost will be 10% of the total order cost with a minimum cost of $5 and maximum cost of $25 ($5 for orders $50 and under, $10 for a $100 order, $25 for a $250+ order, etc.)
[fee percent="10" min_fee="5" max_fee="25"]
Setup WooCommerce Local Pickup Method
The local pickup shipping method is a great way to let customers pick up their order from your store. It is a great option for restaurants and other local businesses who regularly have customers come to their physical location to pick up their order.
Like the other shipping methods, go to WooCommerce > Settings > Shipping, and click the Edit link under the Shipping Zone you want to add Local Pickup to.
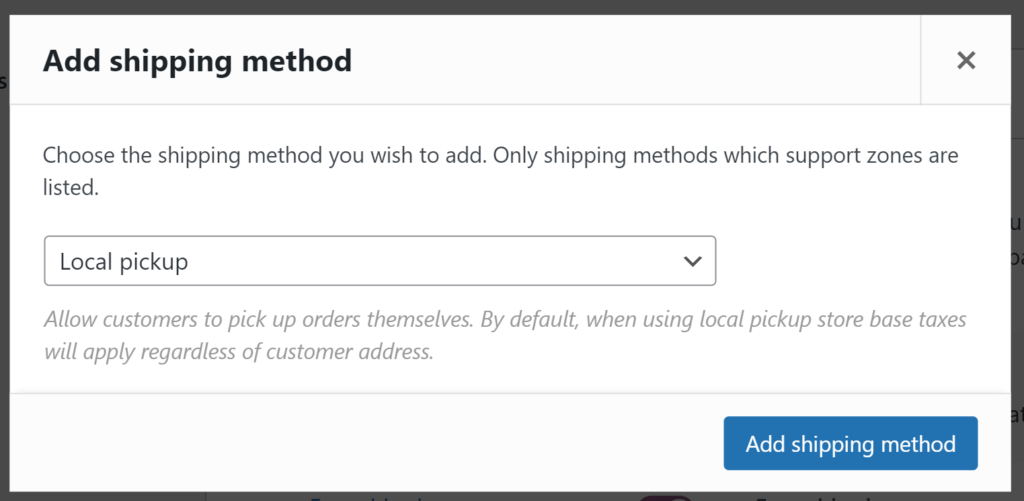
Click the Add Shipping Method button and a modal window will then pop up. Then, select Local Pickup in the dropdown menu and click the Add Shipping Method button.
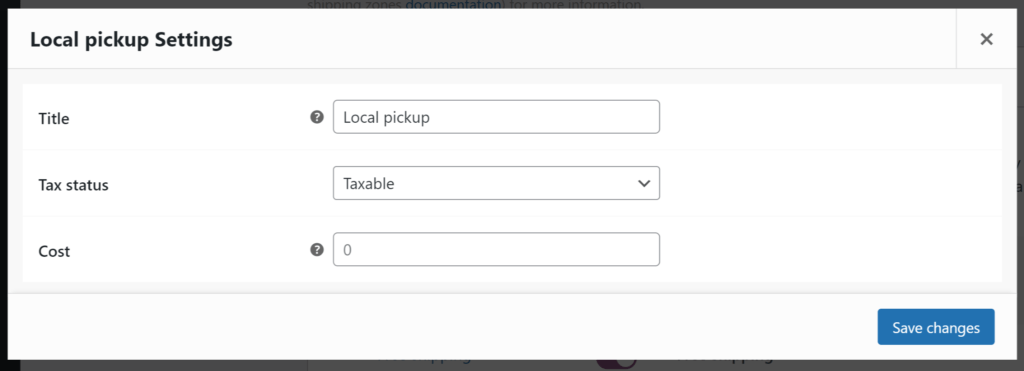
After that, click Edit under the Local Pickup shipping method you wish to configure. This will then open a modal window that lets you edit the local pickup options.
Like the flat rate option, you have three settings. Similarly, enter a title that customers will see at checkout, determine whether or not the shipping cost is taxable, and enter the cost of shipping.
It is wise to not charge your customers if they are picking up their own order. For instance, very rarely would it ever make sense for you to charge a customer for the privilege of picking up their own order. However, if you change the title shown to the customer to something like “Local Delivery”, it may make sense to charge a fee. Then you can use your own delivery drivers or a courier to deliver orders to customers locally.
WooCommerce Shipping Costs Wrap-up
There are many things to consider when determining how to add WooCommerce shipping costs. However, with the basic shipping methods covered in this article, you can see that there are quite a few options available to you.