How To Setup PayPal With WooCommerce

PayPal is one of the most popular payment options for online transactions in the United States. Selecting the right payment processor is an important step when you set up your WooCommerce store. If you run an ecommerce store with WooCommerce you will want to seriously consider offering PayPal as a payment option. This article will show you how to setup PayPal with WooCommerce so you can keep your customers happy.
What is PayPal?
In addition to being a popular method for buying products online, PayPal offers it’s users an easy way to send and request money online. This lets users transfer money from their account to a friend’s or family member’s account too. It has become so popular in certain parts of the world that some people will use their PayPal account instead of a credit or debit card. In 2019 alone they processed over $712 billion with over 305 million active user accounts. If you wish to sell to people in certain areas of the world, it is almost a necessity to have a PayPal option on your WooCommerce store.
Is PayPal Right for my Store?
There are pros and cons to using PayPal on your WooCommerce store. The biggest downside is that it redirects customers to PayPal’s website to complete their payment. This can be a jarring experience for some customers who may not be familiar with PayPal. On the other hand, if your customers are familiar with PayPal, this is expected, and even welcomed. Once on the PayPal website, customers can pay by logging into their PayPal account, or pay by credit card if they don’t have a PayPal account. This ensures that you can accept payment from both PayPal users and non-PayPal users alike.
A benefit to using PayPal is the ability to accept payments from areas of the world that may not otherwise be able or willing to buy online. Much of the African population does not have access to traditional banking services, and 80% of Germans won’t finish their purchase if the available payment methods do not suit them. As you can see, there are many variations in shopper’s preferences that need to be considered. Generally, customers prefer having a choice when it comes to the method of payment they use online. By offering PayPal, you provide customers with one more choice, which could be the difference between making the sale and having an abandoned cart.
Additionally, you need to have a PayPal Business account in order to setup payments with PayPal through WooCommerce. Fortunately, a business account is free. You can even convert an existing personal account to a business account. However, if you do convert a personal account to a business account, it isn’t easy to switch back if you decide to later on. It may be easier to sign up a new PayPal business account.
Setup PayPal With WooCommerce
WooCommerce comes with PayPal Standard as a payment option by default. You don’t have to install any additional plugins in order to get access to PayPal’s standard features, but it does require a little bit of setup.
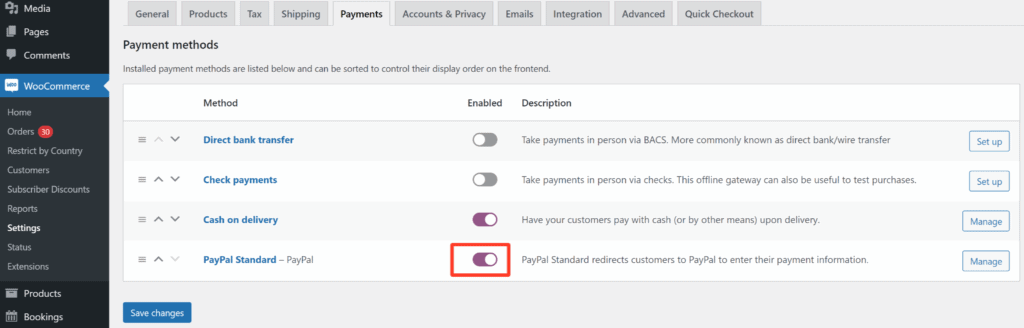
- Navigate to WooCommerce > Settings > Payments tab.
- Click the toggle switch to enable PayPal Standard.
- Click the Manage button next to PayPal Standard.
Note on PayPal Sandbox and Live Payments
The PayPal payment method in WooCommerce has a mode called Sandbox mode. This enables you to test payments on your website without actually accepting real money. In order to use PayPal Sandbox, you need to sign up for a developer account where you will get credentials to use while testing your site. It is important that you enter these credentials in the correct area and not enter them in with your live payment credentials. When you place a test order while in Sandbox mode, it functions just like a real order. An order will appear in WooCommerce, emails are sent, and inventory will be reduced just as if it were a live customer placing the order. The only difference is that your account won’t get any real money. After you are done testing your PayPal setup in WooCommerce, you can turn off Sandbox mode to begin accepting payments.
PayPal General Settings in WooCommerce
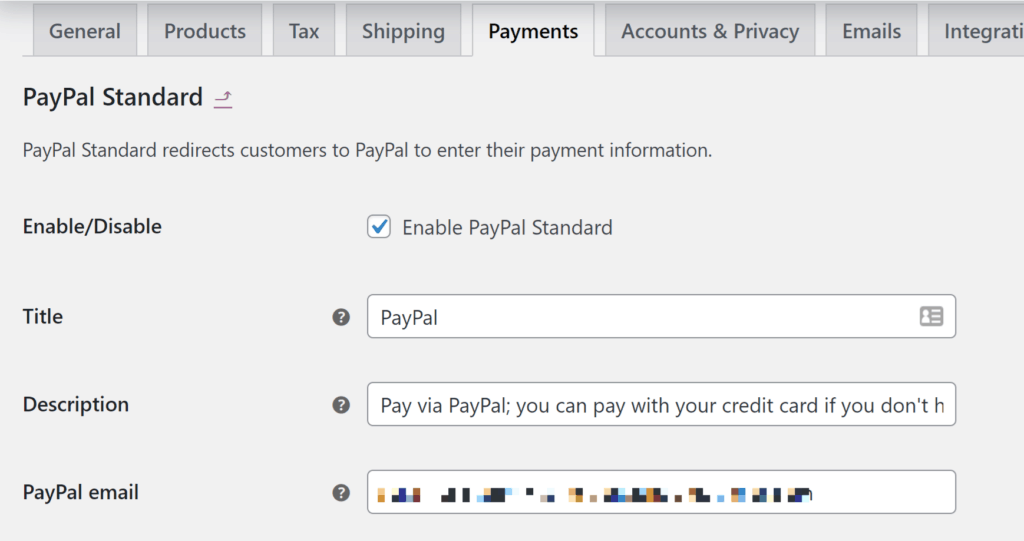
In the first section, fill in the following information:
- Enable/Disable: Check the box to enable PayPal Standard if it isn’t already checked.
- Title: Enter the title you want customers to see when they are checking out. You may want to leave this as “PayPal” so customers know that they have PayPal as an option.
- Description: Enter a description to help customers understand what this payment option is. The default description is usually a good enough here.
- PayPal Email: Enter the same email address on your PayPal business account. It is important that this matches exactly to your PayPal business account’s email. See sandbox instructions below if using sandbox mode.
Advanced PayPal Options
Under Advanced Options, there are several settings, however not all of them need to be used. Read through each to determine what your store needs.
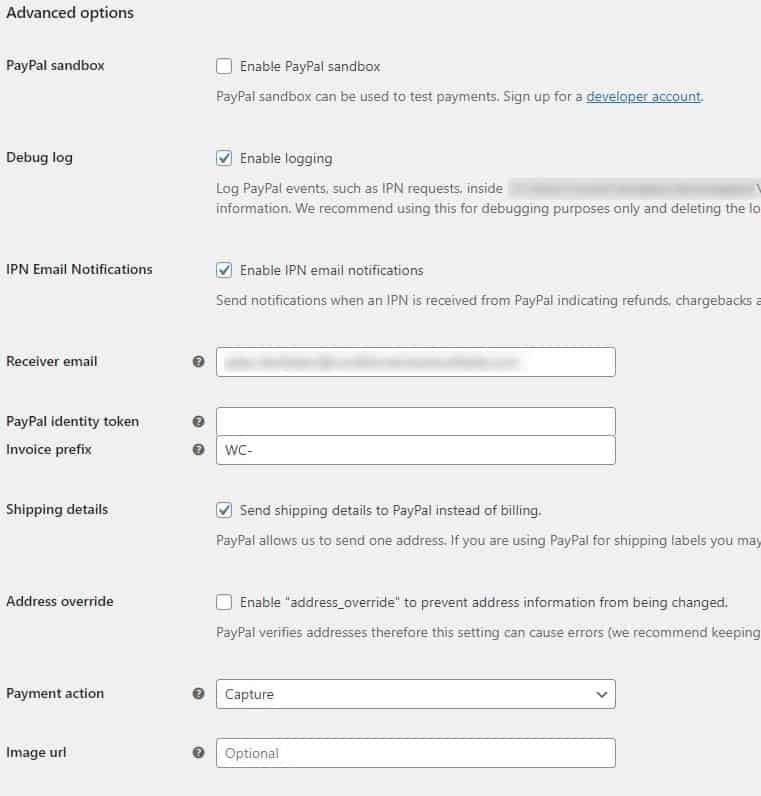
- PayPal Sandbox: Enabling PayPal sandbox mode will allow you to test payments on your website. Checking this box will also change the fields shown in the API Credentials section between the live API credentials and the sandbox API credentials (see below for more information).
- Debug Log: Enabling logging will allow the plugin to keep a record of all events that run through the plugin. After you finish debugging, it is recommended that you uncheck this option, and delete the log in the file location shown in this section.
- IPN Email Notifications: Instant Payment Notifications (IPN) are sent from PayPal any time you receive a payment, issue a refund, a chargeback is created, or an order is cancelled.
- Receiver Email: This is where you will receive email for your PayPal account. See sandbox instructions below if using sandbox mode.
- PayPal Identity Token: A PayPal Identity Token allows payments to be verified with Payment Data Transfer instead of PayPal’s IPN. This is a good option if you are having trouble with PayPal’s IPN.
Enable PayPal Payment Data Transfer
You have to enable this option in your PayPal account first before it can be used. In your PayPal account, go to Profile > Profile and Settings > My Selling Tools > Website Preferences to enable Payment Data Transfer. Copy the identity token and paste it into the settings after enabling Payment Data Transfer.
- Invoice Prefix: You can enter anything you wish for the prefix to your PayPal invoice numbers. This is a useful way to denote which store a transaction came from if you have multiple stores.
- Shipping Details: PayPal only allows one address to be sent with each order while WooCommerce can collect two (billing and shipping). If you use PayPal for shipping labels you may wish to send the shipping address instead of the billing address. Additionally, PayPal Seller Protection requires you to send a shipping address, so you might not be covered if this option is not used.
- Address Override: PayPal will verify addresses if this option is enabled. This may reject the customer if PayPal doesn’t fully recognize the address. It is recommended to keep this option disabled.
- Payment Action: Select whether you want to capture the payment immediately, or authorize the transaction. Capturing payments puts the funds in your PayPal account immediately. Authorizing places a hold on the funds in your customer’s account and is valid for 29 days.
- Image URL: Enter the URL to a 150×50 pixel image that will be displayed on the PayPal checkout pages. This will brand the PayPal checkout page, helping customers trust the checkout process a little more.
PayPal API Credentials in WooCommerce
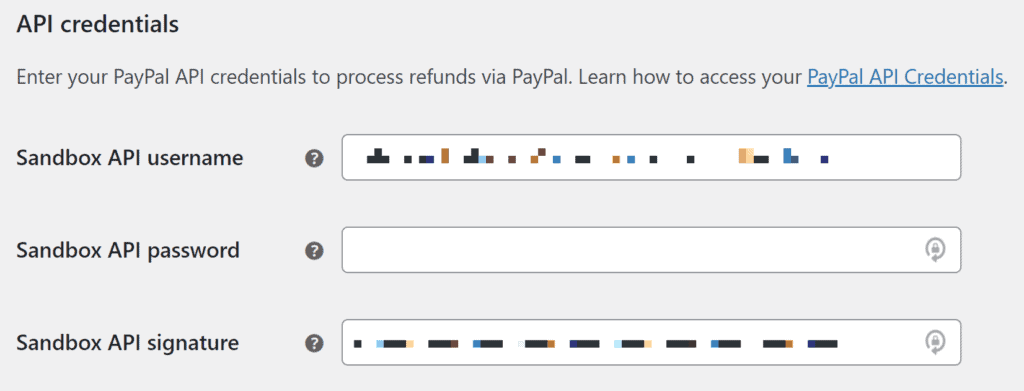
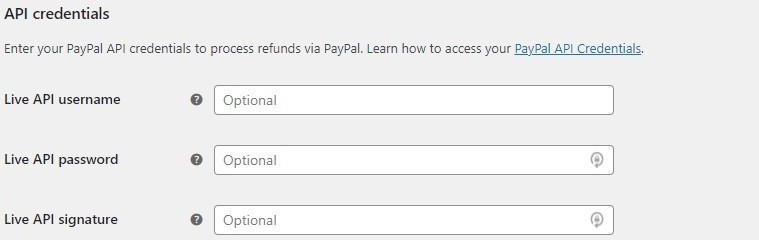
Your API credentials allow you to process refunds in PayPal directly from your WooCommerce store. Without the API credentials setup in WooCommerce, you would have to manually refund any purchases through your PayPal account. This adds an extra step and therefore is unnecessary. It takes just a couple minutes to setup the PayPal API credentials in WooCommerce so, you can easily avoid this extra step.
There are three fields to paste your API information into:
- Username
- Password
- Signature
These fields will change depending on whether you have enabled PayPal Sandbox (see above). When PayPal Sandbox is disabled, you will see fields for your Live API username, password, and signature. When it is enabled, you will be shown fields for the Sandbox API username, password, and signature. The process to get these credentials is different, so we will walk through how to retrieve both sets of API credentials.
How to get Live PayPal API Credentials
- Login to your PayPal account at paypal.com.
- Then, navigate to Account Settings > Account Access. Account settings are located under the menu with your name in the top right corner of the screen.
- Click Update next to API Access.
- Select Manage API Credentials under the NVP/SOAP API integration (Classic) section.
- The next page will display your Live API username, password, and signature, although for security purposes they will be hidden. Click the “Show” link to display each of them.
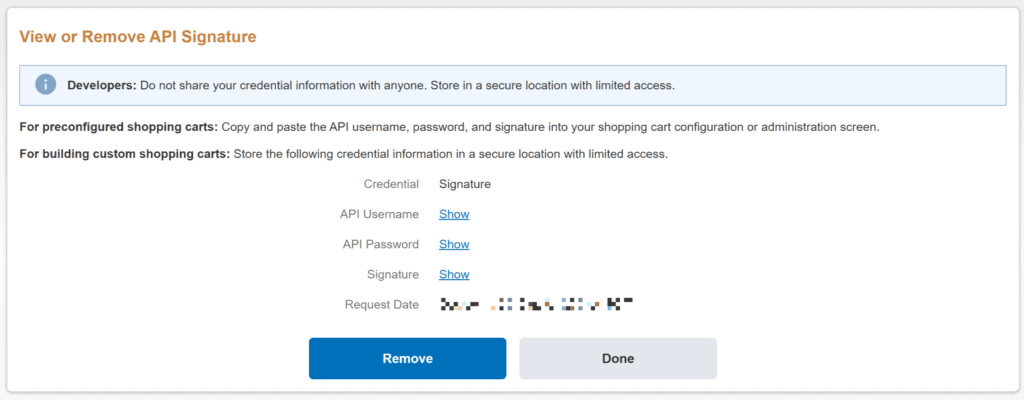
Finally, copy each of the credentials and paste them into the appropriate box in your WooCommerce settings.
How to get PayPal Sandbox API Credentials
- Visit developer.paypal.com and sign up for a PayPal developer account.
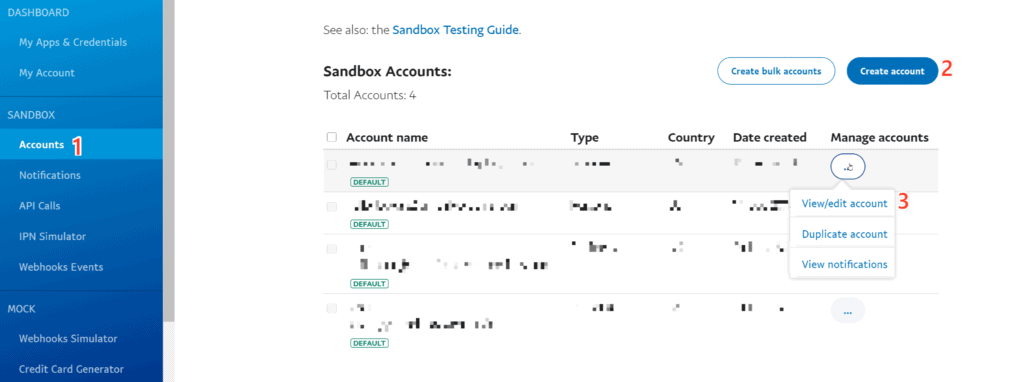
- Select Accounts (1) under the Sandbox heading after signing into your account.
- Click the Create Account (2) button if you don’t already have an account set up. Fill in the fields you are presented with to meet your requirements.
- Then, under the Manage Accounts column select View/Edit Account (3) from the three dots menu to view the sandbox account’s details.
Next, copy the Email ID provided to you on the Profile tab of the Account Details window. Use this email address for both the PayPal Email and Receiver Email fields in the PayPal settings in WooCommerce.
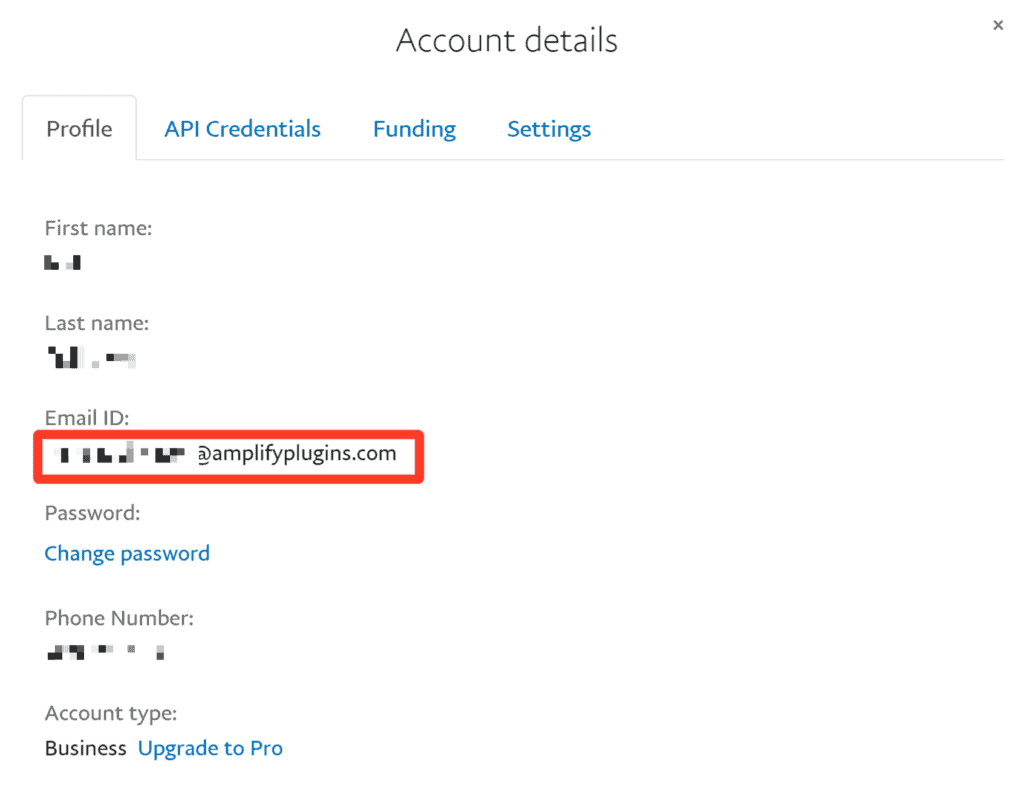
Next, click the API Credentials tab and copy the username, password, and signature under the NVP/SOAP Sandbox API Credentials heading.
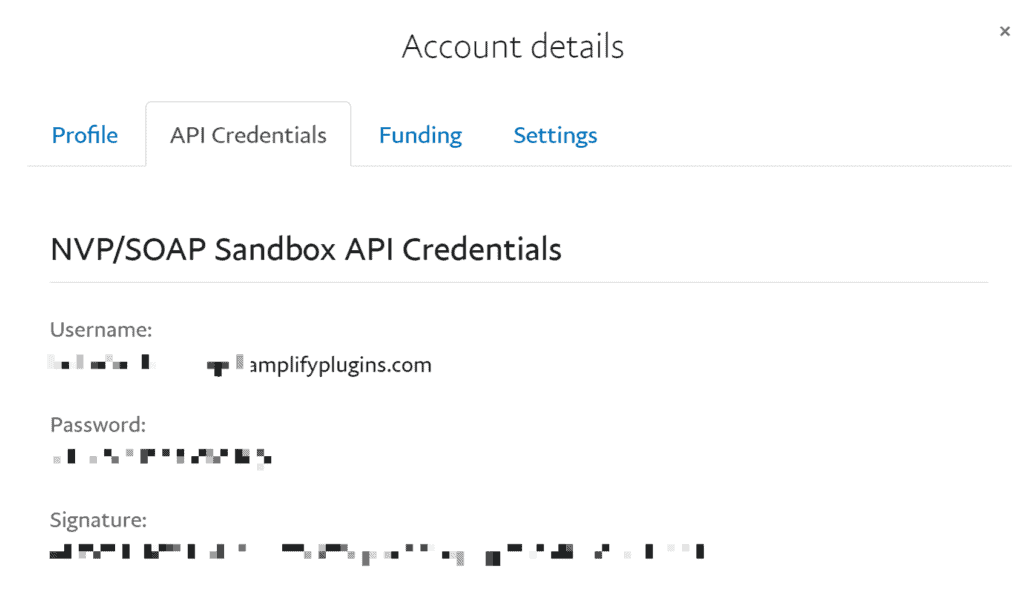
You will then paste each of these separately into your WooCommerce PayPal API Credential settings. Be sure to check the PayPal Sandbox box under Advanced Options in the WooCommerce settings. This will switch the API Credentials fields from Live to Sandbox fields.