How To Setup Stripe With WooCommerce

Stripe is one of the easiest to use payment gateways for online transactions. Not only does it securely process transactions without requiring your customer to leave your site (unlike PayPal), it also is a breeze to set up. However, selecting the right payment processor for your WooCommerce store is an important step. If you are starting an ecommerce store with WooCommerce, you will want to give Stripe some serious consideration. This article will show you how to setup Stripe with WooCommerce so you can start accepting payments right away.
What is Stripe?
Stripe is a technology company who makes it easy for ecommerce businesses to accept payments online. Their integration with WooCommerce allows for a seamless checkout experience. Stripe came along during a time where ecommerce businesses needed to work with an incredibly complicated array of third parties in order to accept credit cards online. Signing up for a merchant account was a requirement for most online businesses, which was a cumbersome process at best. Stripe’s goal was to streamline the process and make it easier for ecommerce businesses to start selling online. Stripe grew quickly because it was built with clear instructions on how developers could integrate with it, enabling many ecommerce platforms (including WooCommerce) to start integrating with Stripe.
Is Stripe Right for my Store?
Stripe offers a wide range of payment options for WooCommerce store owners. Like most credit card processors, you can accept simple one-off credit or debit card purchases. Stripe also has the ability to collect payments for subscriptions. Stripe accepts all of the major credit cards (AMEX, Visa, Discover, Mastercard) as well as UnionPay, JCB, Diners Club and several other local niche brands. Additionally, Stripe accepts digital wallets like Apple Pay and Google Pay. Stripe can accept payments in over 135 currencies from most countries around the world. If your customers come from different parts of the world, Stripe might be a good option for you.
Stripe lets users avoid signing up for a merchant account by allowing their users to be considered “sub-merchants” under Stripe’s merchant account. This significantly shortens the process of getting started selling online. The downside to this is that Stripe generally charges a higher fee than a traditional merchant account would. For many store owners, the ease of getting set up with Stripe is worth the slightly higher fees. Stripe’s standard fees are 2.9% + $0.30 per transaction where merchant accounts can be anywhere from 0.8-1.9% + a small flat fee. For example, a $100 transaction would cost $3.20 with Stripe versus approximately $1-$2 with a merchant account.
If you are processing high volumes, Stripe may not be the best option for you. You’ll have to consider the costs of setting up a merchant account versus the higher transaction fees.
Setup Stripe With WooCommerce
Stripe for WooCommerce is a free plugin, which allows you to easily get started accepting credit cards on your site. In minutes, you can have a WooCommerce store that accepts all major credit and debit cards through a PCI-compliant checkout, which supports Strong Customer Authentication (SCA) for many European customers.
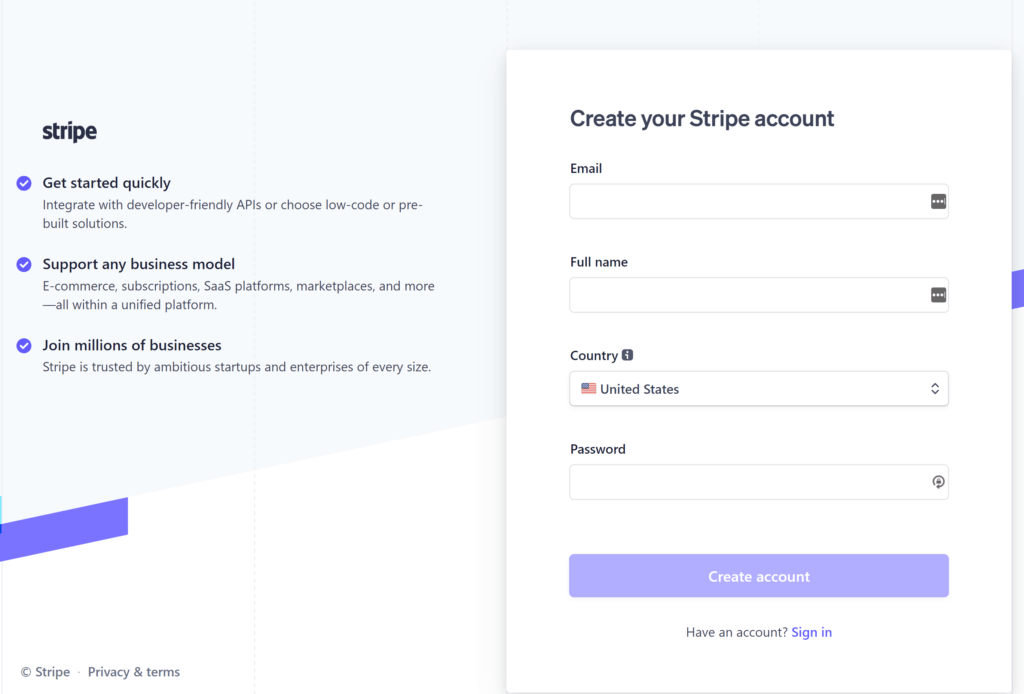
Create a Stripe Account
To create a Stripe account, you will need to visit https://dashboard.stripe.com/register. Once you enter the basic information it requests, it will prompt you to add additional information about your business. Stripe has a few business types that they will not work with, so they need to make sure your business will follow their guidelines.
Once your account is set up, enter your bank account information so that Stripe can deposit the funds it charges into your account. This will also allow them to process refunds should the need arise. Without a bank account attached to your Stripe account you won’t have access to the money Stripe processes. Typically this will be your business bank account. If you don’t have an account setup for your business, I highly recommend it so that you keep your business and personal accounts separate.
Install Stripe Plugin in WooCommerce
Installing the Stripe plugin for WooCommerce is the same process that you would use for any other plugin.
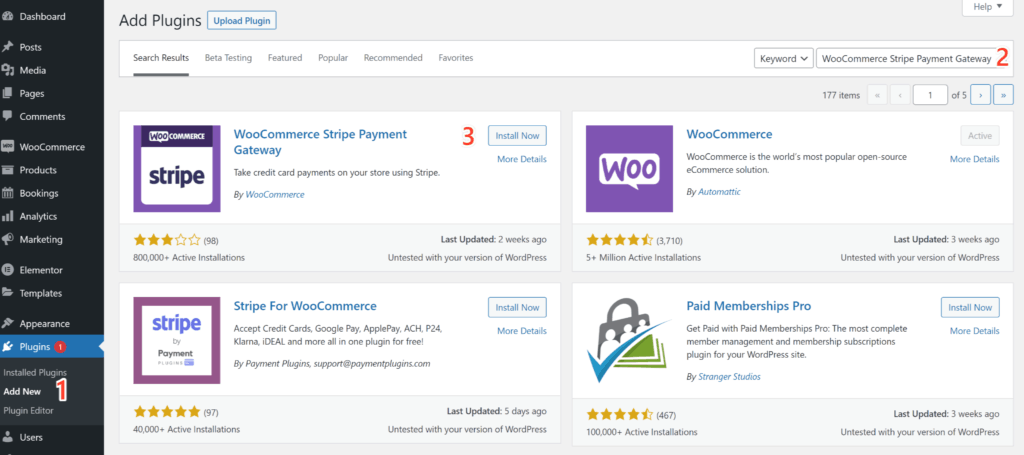
- Navigate to Plugins > Add New in your WordPress dashboard.
- On the Add Plugins screen, type “WooCommerce Stripe Payment Gateway” into the search box.
- Click the Install Now button that appears next to the Stripe plugin. There may be other Stripe plugins that appear in the list. Be sure that the plugin you install is the one that says it is developed by WooCommerce.
- The Install Now button will change to say “Activate” once when the plugin is installed. Click the Activate button once when it becomes available.
Configure Stripe for WooCommerce
In order to use Stripe for WooCommerce you will first have to enable it as a payment option on your site.
- Navigate to WooCommerce > Settings > Payments tab.
- Click the toggle switch to enable Stripe.
There are a number of additional payment methods to target customers in different markets. These include SEPA Direct Debit, Bancontact, SOFORT, Ciropay, EPS, iDeal, P24, Alipay, and Multibanco. Any of these can be used, however this tutorial will only cover the main Stripe credit card gateway setup.

Click the Set Up button next to Stripe.
Stripe WooCommerce General Settings
In the Stripe settings, enter the following information:
- Enable/Disable: Check the checkbox to enable Stripe.
- Title: Enter a title that customers will see during checkout.
- Description: Enter a short description to tell customers what to expect from this payment method.
Stripe Account Keys
Stripe offers users the ability to test payments on their site without processing actual credit cards. They use a separate set of credentials called “test keys” and “live keys”. The test keys enable users to test their Stripe setup with fake credit card numbers. Stripe provides several fake credit card numbers, which can be used to test different scenarios, such testing a failed address or zip code verification. This can be useful to help determine how your store will behave when a customer enters incorrect information.
- Test Mode: Check the checkbox to enable test mode. The next two fields (publishable and secret keys) switch to Test Publishable Key and Test Secret Key with this box checked. When it is unchecked, they switch to Live Publishable Key and Live Secret Key. Additionally the Webhook Secret field switches to Test Webhook Secret with this field checked. See more on webhooks below.
- Publishable Key: Enter the API key from your Stripe account.
- Secret Key: Enter the API key from your Stripe account.
Where Do I Find My Stripe API Keys?
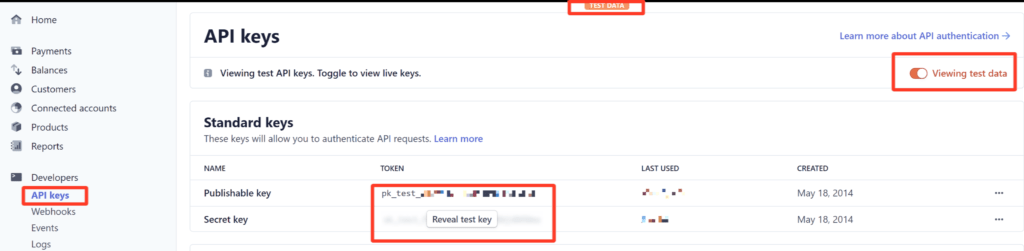
In your Stripe account, click the Developers tab on the left side and select API Keys. Copy the Publishable Key and Secret Key and paste them into the correct fields in the WooCommerce Stripe settings. You can toggle between live and test API keys by using the toggle switch on the top right side of the page. When viewing your live keys, they will begin with pk_live_ and sk_live_. When viewing your test keys they will begin with pk_test_ and sk_test_. Additionally, there will be an orange “Test Data” notice at the top of the page.
Webhook Endpoints
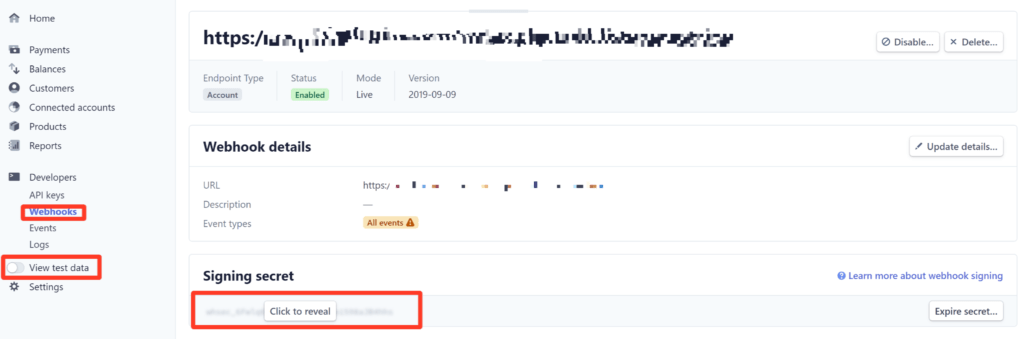
Setup webhooks to allow Stripe to send notifications about charges back to your WooCommerce store. You can add an endpoint in your Stripe account by visiting the Developers > Webhooks tab. From there click the Add Endpoint button. Enter the URL provided to you in the WooCommerce Stripe settings in the Endpoint URL field. Typically this will end with /?wc-api=wc_stripe. Optionally, add a description, and select the version of the API to use. Finally, select the events you wish to receive. You may wish to receive all events so you don’t miss anything. Then click the Add Endpoint button.
Like the API keys, there are both test and live webhooks. When creating a test webhook, be sure to toggle the “View Test Data” switch on the left side of the screen before creating the test webhook. Toggle that switch off if you wish to create a live webhook.
You will be able to get the signing secret to enter into the Stripe WooCommerce settings once the webhooks have been created in Stripe. Copy and paste the webhook signing secret into the Webhook Secret field in your WooCommerce Stripe settings. Keep in mind that if you have enabled test mode on your Stripe settings that you will need to enter the test webhook secret.
- Webhook Secret: Copy and paste the Signing Secret (see details above).
Additional Stripe WooCommerce Setup Settings
- Inline Credit Card Form: This will change the appearance of the credit card form on the checkout page. You may wish to test both the inline and non-inline credit card forms to see which works best for your store.
- Statement Descriptor: This will appear on your customer’s credit card statement in all capital letters. It is limited to 22 characters and can’t use certain special characters ( >, <, “, \, ‘, *, /, (, ), {, and } ).
- Capture: Whether or not to immediately capture the charge. When checked, Stripe will immediately charge the customer’s credit card. When unchecked, Stripe issues an authorization, which needs to be manually captured later.
- Payment Request Buttons: Checking this box will enable customers to pay with Apple Pay or Google Pay if it is supported by their browser.
- Payment Request Button Type: When choosing the option here, you will get additional options if you select Branded or Custom.
- Branded will enable the Payment Request Branded button Label Format option. You can choose from Text and Logo, or Logo Only.
- Custom will enable the Payment Request Button Label field. Enter the custom text you would like the button to have here.
- Payment Request Button Theme: Select the button theme that you would like to show.
- Payment Request Button Height: Enter the height you would like the button to be in pixels. The width will always be 100%.
- Saved Cards: Check the box if you wish to allow your customers to pay with a saved card during checkout. This can enable a faster checkout experience for your customers. Customer card details are stored on Stripe’s servers, not on your store.
- Logging: Check the box to enable debugging messages to be saved to the WooCommerce System Status log. This should be unchecked for live stores unless there is a problem you are actively debugging.
Finalizing Stripe WooCommerce Setup
After you have verified that all of the settings are entered correctly, click the Save Changes button.
You will want to do a few test transactions to make sure that Stripe is setup correctly on your WooCommerce store. Occasionally, other plugins can interfere with how Stripe works, so you should be able to identify if your site will have any trouble using Stripe by using the test mode. Just be sure to go back to the Stripe settings and uncheck the Enable Test Mode box before accepting live payments.