How To Add WooCommerce Products

There are many steps to setting up any WooCommerce store. One of the most fundamental steps is to add products to your WooCommerce store. When adding products to your store, there are many pieces of information you will need to add. It is generally helpful to collect this information ahead of time so that you can add your products easily. In some cases though, you may end up adding a few products to your site at a time. Many sites that sell custom products or those in limited quantities won’t have a robust catalog of products when they first set up their store. That’s OK too! You can continuously add products to your WooCommerce store even after the initial setup.
Manual v.s. Import Products
Generally, stores that have a lot of products will want to import those products to their WooCommerce site. The reason is simple – it can take a lot of time to manually add each product. We’ve already covered how to import products to your WooCommerce store so we won’t go into that here. We will, however, talk about the different types of information you will need to gather for each product, which is useful whether you are manually adding products or importing them to your WooCommerce store.
Manually adding products is a good way to go if you only have a few products to add. This can be useful for stores that sell one-off products, or only add a small number of products on an infrequent basis. The reason why manually adding products is better than importing, in this case, is because it is possible that your import can override certain details of existing products. For example, if you did not update your import sheet with current prices or inventory levels of existing products, those products could get updated with incorrect information. If all you are trying to do is add a product or two, manually adding them to your WooCommerce store is probably the better way to go.
How to Manually Add WooCommerce Products
WooCommerce products can be thought of just like posts and pages in WordPress. They all have a title, text content, category, and usually a featured image. WooCommerce products have some additional custom information such as price, inventory, and some other information. Outside of this extra information, WooCommerce products are pretty much treated the same way as posts or pages.
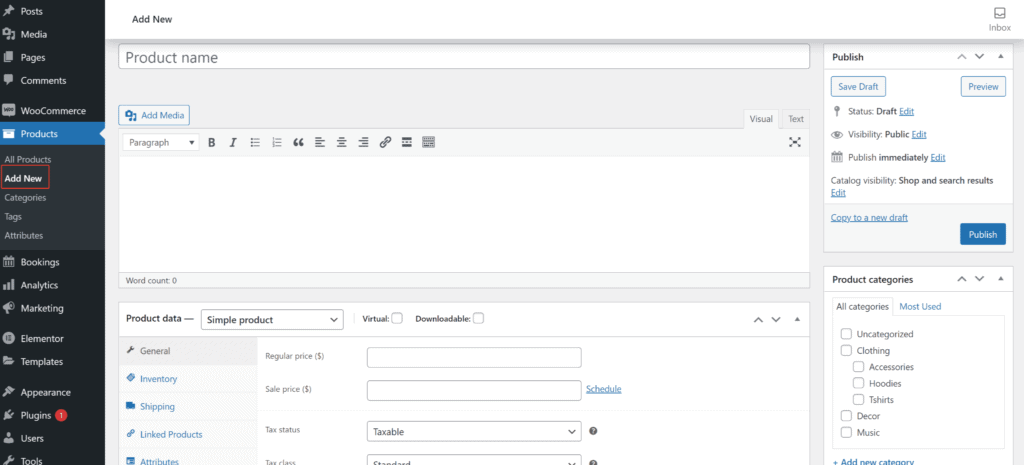
To manually add a WooCommerce product, navigate to the Products > Add New link on the WordPress admin navigation bar.
Information Needed to Add WooCommerce Products
All products, whether they are simple products, variable products, or any other number of products will require a few pieces of information.
- Product Name: This name should be descriptive of the product so that customers know what to expect before reaching the product page. It also will be shown on the order information after customers place their order.
- Product Description: This should go into more detail and describe the product. This information can help customers decide if the product is right for them. It is also used by search engines to help discover what your product is all about.
- Product Categories and Tags: It may make sense to group similar products on your WooCommerce store. This can help customers find what they’re looking for without having to search through many other irrelevant products. Product Categories and Product Tags allow you to do just that.
- Product Categories: Categories can be grouped in a hierarchical format so if your store sells clothing and books you might have the following categories:
- Clothing
- T-Shirts
- Sweatshirts
- Pants
- Books
- Mystery
- Animals
- Biographies
- Clothing
- Product Tags: Unlike Categories, Tags are not hierarchical. In the above example where you sell clothing and books, you might have a t-shirt with a lion on it and a book about lions. You could add the “lion” tag to both the t-shirt and the book so that customers looking for products featuring lions can find them easily.
- Product Categories: Categories can be grouped in a hierarchical format so if your store sells clothing and books you might have the following categories:
WooCommerce Product Data
The Product Data section is below the product description box. This is where most of the other important information will go for your products.
General Tab
- Regular Price: The price that this product will normally sell for.
- Sale Price: A discounted price that can be scheduled for certain date ranges.
- Tax Status: Choose whether the product should be taxable, if only shipping is taxable, or if no tax should be charged on the product.
- Tax Class: Choose the tax class to apply to the product.
Inventory Tab
- SKU: Or, Stock Keeping Unit. It is a unique identifier for each product you sell.
- Manage Stock checkbox: Check this box if you wish to have WooCommerce manage the inventory of this product. If this box is not checked, you can choose a Stock Status of In Stock, Out of Stock, or On Backorder.
When you select the Manage Stock checkbox you will have several new options:- Stock Quantity: Enter the quantity of this product that you have in stock. Note: This number will be reduced by the quantity purchased by customers automatically. As you restock products you can update this number manually to match your new inventory count.
- Allow Backorders: If backorders are allowed, your product stock can go below 0. Options include Do Not Allow, Allow, But Notify Customer, or Allow.
- Low Stock Threshold: When your product’s inventory reaches the number set here, the store manager will be notified by email. This is a useful tool to indicate when it is time to restock your inventory.
- Sold Individually: If you select this box, it will only allow a customer to purchase one of this item in a single order.
Shipping Tab
If your products need shipping set up, the Shipping tab adds the information shipping carriers use to calculate the correct shipping costs.
- Weight: Enter the weight of the product in the unit of measurement indicated (KG, LBS, G, or OZ). If you wish to change the unit of measurement, navigate to WooCommerce > Settings > Products tab > General subtab. Change the weight unit under the Measurements section.
- Dimensions: Enter the length, width, and height of the product in the unit of measurement indicated (CM, MM, IN, or YD). If you wish to change the unit of measurement, navigate to WooCommerce > Settings > Products tab > General subtab. Change the dimensions unit under the Measurements section.
- Shipping Class: Choose the shipping class to use for this product. For more information on how to set up shipping classes, see our guide on how to add WooCommerce shipping costs.
Linked Products Tab
The Linked Products tab lets you set up upsells and cross-sells to help promote your products.
- Up-Sells: These are products you might want to recommend to customers instead of the currently viewed product. This could be a way to promote more profitable, or better quality products.
- Cross-Sells: These are products that will be promoted to the customer on the Cart page if the current product is in the customer’s cart. This is a great way to get customers to buy other complimentary products in addition to the product they are already buying. For example, if the product requires batteries, you can suggest that the customer also buys the batteries from you.
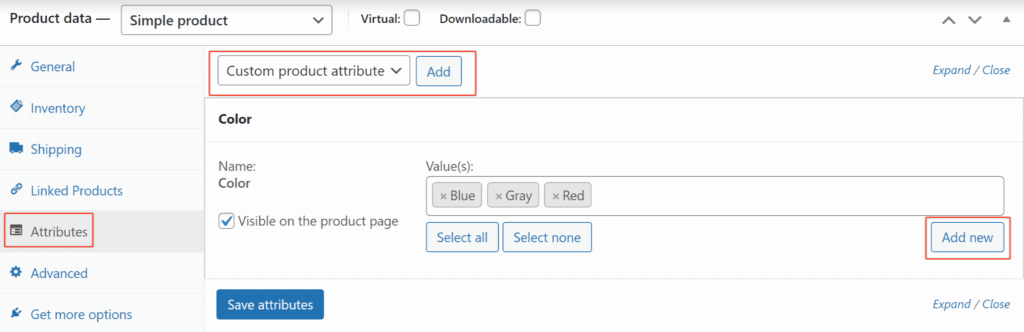
Attributes Tab
Product attributes can be used to group products with similar characteristics. This will serve as data for a widget you can add to your site’s sidebar where customers can filter products based on certain attributes. For example, if you sell clothing, you can have a color attribute so customers who know they want to buy a certain color can be shown just the products in the color they’re looking for. Additionally, attributes are what will create variable products. Variable products are covered later in this article. To create a variable product, you have to define the attributes for the product first. These attributes will then be used to create the variations.
To add a custom product attribute, choose Custom Product Attribute from the select menu and click the Add button. Next, enter a name (i.e. Color, Material, Size, etc.) that customers will be able to use to identify the type of attribute. Then enter a list of attributes with a pipe character (“|”) separating each attribute. If the product attributes should be visible on the product page, check the Visible on Product Page box.
As an example, you can add a color attribute as follows:
- Name: Color
- Value(s): Blue | Gray | Red
If you already have an attribute with the same name set up, select it from the select menu where you previously chose Custom Product Attribute. After clicking on the Add button, you will see that attribute display below. You can select any of the relevant attributes for this product that are already set up or add new attributes by clicking the Add New button. After clicking Add New, a popup will prompt you to enter the new attribute. In the color example, I may wish to add an Orange value so I would type “Orange” in the prompt.
Advanced Tab
- Purchase Note: Optionally, add a note that will send to the customer after they purchase this product.
- Menu Order: This lets you manually rearrange your products.
- Enable Reviews: Choose whether or not you wish to allow customers to leave a review for the product.
Product Short Description
This is a brief description of the product that will typically display next to the product’s image. The longer description entered above will usually display in the Product Description tab. These locations are determined by your site’s theme, so they may display in different locations on your site.
Product Images
There are two types of images that you can add to your product so that customers can see what it looks like for themselves.
- Product Image: This is the main image that will be featured on the product detail page. It will also display on the shop pages throughout your site. This image should give your customers a good general overview of the product.
- Product Gallery: Here you can add many images to give the customer a better look at what they’re about to purchase. This can be photos of the same product from different angles (front, back, top, bottom, sides), or in different settings (a poster hung in a bedroom or in a coffee shop). You can also show the different attributes (i.e. colors or sizes).
Adding images to the product image or gallery is the same process you would use to add featured images to a blog post. The biggest difference between the two is that the Product Image section only allows you to select one image, while the Product Gallery section lets you choose many images.
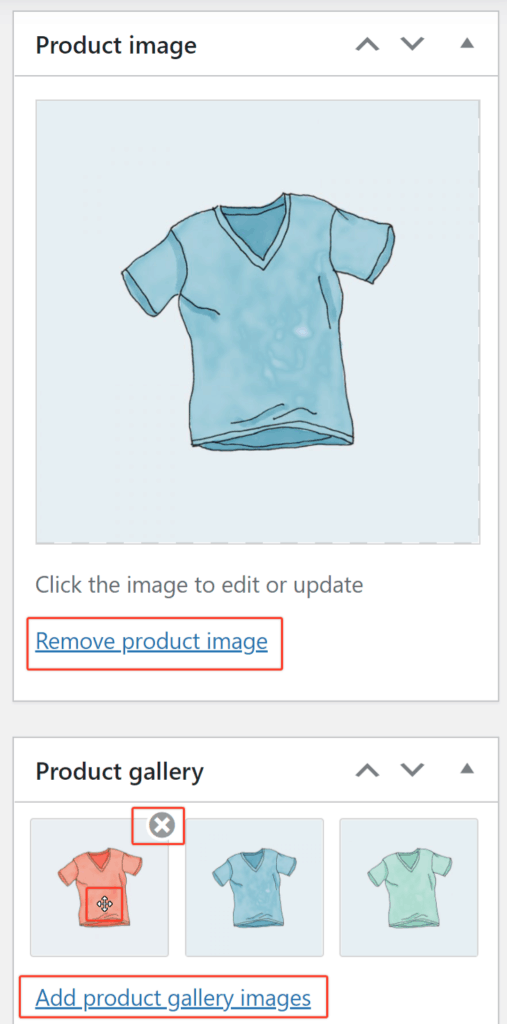
To add a Product Image, click the Set Product Image link. Note this link changes to Remove Product Image after you have added an image here.
In the Product Gallery, you can rearrange the order of the images by clicking and dragging the images. You can also remove an image by hovering over the image and clicking the X that appears in the top right corner. You can add images to the product gallery by clicking on the Add Product Gallery Images link and selecting or uploading the images you wish to add.
Getting Ready To Publish Your Product
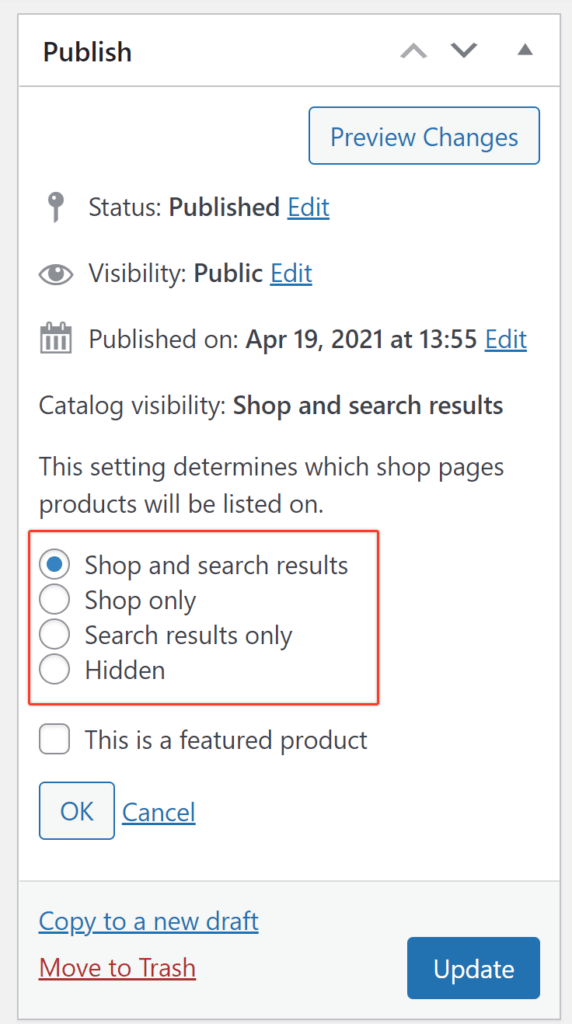
Before you publish your product, you should determine which pages the products should be listed on. By default, the product will be visible in all possible areas on your site. However, in some cases, you may not want the product visible everywhere.
In the Publish box, click Edit next to Catalog Visibility to expand the visibility options.
- Shop and Search Results: This is the default option, and makes the product visible everywhere on your site. This includes shop pages, category pages, and search results.
- Shop Only: This makes the product visible in the shop and category pages, but not in the search results.
- Search Only: This option makes the product only available in the search results. With this option selected, the product will not display in the shop or category pages.
- Hidden: The product will be visible on the single product page, but not on any other pages.
You can optionally set the product to be a Featured Product. By checking this box, the product will be displayed more prominently in product categories, up-sells, related products, etc.
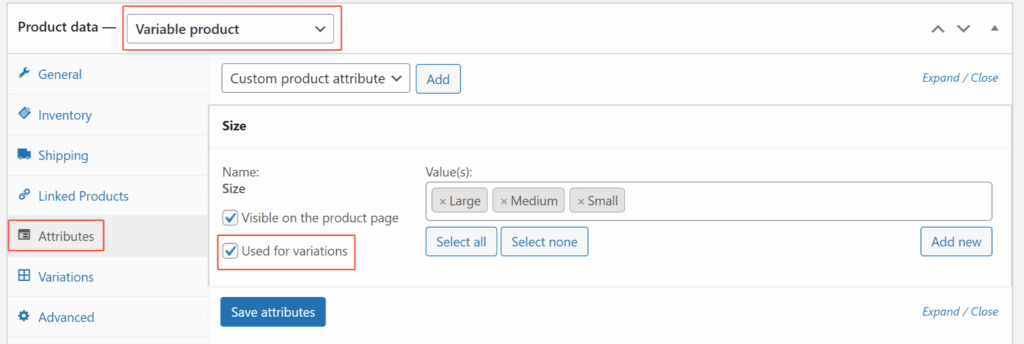
Variable Products
Variable products are generally the same with a few slight differences in the attributes. For example, if you sell shirts you may have a size variation where you sell Small, Medium, Large, and Extra Large shirts. The shirts are generally the same except for the size. It doesn’t make a lot of sense to create four separate simple products to sell the same shirt in different sizes. In this case, you can use a variable product to sell all of the different variations of a product.
In the Product Data box, you will select Variable Product from the select menu.
When you view the Attributes tab you will see a new checkbox that lets you indicate that the attribute should be used for the product’s variations. Check that box then click the Save Attributes button.
Variations Tab
There will also be a new Variations Tab. This is where you will add information about each variation of your product. Since each variation can be thought of as a separate product, you will set the product data individually for each variation. This lets you set separate inventory levels, prices, shipping weight/dimensions, shipping, and tax classes, as well as a description for each variation.
To add variations, select Create Variations From All Attributes from the select menu and click the Go button.
Next, click on each variation and add the relevant details. The SKU, price, stock statuses, shipping, and tax information are all the same as what was described above for simple products.
Once you have entered all of the variation data, click the Save Changes button.